Quantcast
Channel: Hugh`s bicycle blog
Viewing all 57 articles
Browse latest View live

CREE XM 1200 Lumen Headlamp Review

$
0
0
Hello and Welcome,
A while back I purchased my first real rechargeable headlamp, the CREE XM 1200. I say "real rechargeable" because I have used rechargeable batteries in my Ze'Fal head and tail lamps. But this lamp has a rechargeable battery pack. It also comes with a band for wearing the lamp on your head. But unless you have a tiny little head ( and I don't) it is really very uncomfortable. It also comes with a charger and a pouch with a Velcro strap for attaching the battery pack to your bike or whatever. I did not purchase the lamp to wear on my head, so I don't really give a rip about the head gear.

Above: The lamp mount is simple enough. It has a half round base with a hook front and back. Using a supplied rubber O Ring around the bars connecting front and rear to the base it holds the lamp in place pretty well. I thought the included O ring was a little too fat for the front hook, which is slightly obscured by the power supply wire. I chose to use a smaller diameter O Ring for mine.

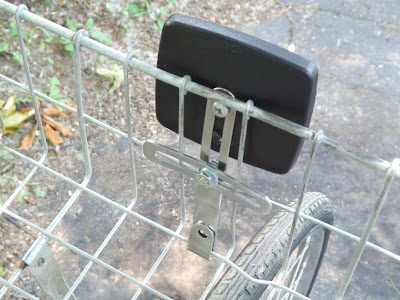
Above: Here I have attached the battery pack to the stem, letting the pouch rest against the head tube. I am riding on mostly smooth and hard packed surfaces, so I do not need to be too careful. I did wrap the power supply wire around the handlebars a few times to take up the slack. When using the headlamp on the L.L. Bean bike or the Single Speed / Fixed Gear Flat Lander I can stash the battery pack and excess power cord in the front rack top bag. Which does look a "bit neater" if that sort of thing matters to you.

Above: The charger is great. It has an indicator light that turns from Red to Green when the the battery pack is fully charged. I would recommend removing the battery pack from the pouch during charging. And I never place the battery pack directly on a table top or counter top. I like to set the battery pack on a ceramic coaster during charging.

Above: Here is a better view of the base and O Ring. Although I have no desire to wear the lamp on my head.. I should mention that during a recent power outage I used this little lamp to light up our living room. It did a wonderful job. And I only had it on the low and medium settings. The strobe or flashing setting is extremely bright and would be a really effective emergency signal light. And despite "one negative review" it charges and holds a charge just fine. Like any rechargeable You do not want to leave it outside in cold weather.

Above: Other than a very small sheet of basic directions this is what you get. The headlamp with supply cord, the charger and the battery pack and the battery pouch with Velcro strap. And of course the head gear for those of you with tiny little heads that might want to use that feature. Did I mention how small the headband is?...ltms

Above: The CREE XM 1200 Headlamp mounted on the L.L. Bean. About Performance... Don't let the small size fool you! This little lamp lights the road unbelievably well. Riding at night I remember thinking to myself "this lights up the road better than the headlamp on my 1969 Yamaha scrambler." (a motorcycle I once owned many many years ago) What really amazed me was seeing the headlamp on strobe setting light up reflective road signs during the day! In all fairness, I was on a heavily tree lined road at the time.

Above: I used the quarter (for scale) to give you a better idea of the actual size of the light. I know I was surprised by how small it was when I first opened the box. But it made me a believer out of me. And did it for not as whole lot of cash. Now I doubt it matchs up with lights that cost 2 to 4 times the price. But I suspect it will come a lot closer than you think.

Above: A few pics from recent local rides to local lakes. Above White Lake from my Diamondback Overdrive 29'er.

Above: Same lake a little farther down the road.

Above: White lake (same day) and a view back down the road from which I came. Standing on the shore just west of the White Lake Inn.

Above: Duck Lake earlier that same day. This is the private beach for the back lot owners. I never use this beach anymore. But the back lot owners association does a wonderful job maintaining it.

Above: A boat crossing the channel into the deep end of Duck lake. Much of Duck lake is very shallow. A pontoon or flat bottom boat is the best way to go on this lake.

Above: A ride to Alderman lake (also a local lake) on another day. This lake is smaller but more natural. I have snorkeled here in the past. This was taken from the boat launch. Memorial day weekend and the lake was empty.
Above: The road towards home from Alderman lake. The 29'er has been perfect for riding on and off the roads here. It is pretty much the only bike I ride anymore.
Until next time, Please RIDE SAFELY and remember to Always.....RESCUE, RESTORE & RECYCLE
Cheers,Hugh

Ladies GIANT "Parts Bike" and American 3 Speed Delivery Bike Project

$
0
0
Hello and Welcome,
I prepped the Zebrakenko mixtie for primer the other day and just as I was carrying it out back to spray, a neighbor just south of me started cutting his very dry grass with his tractor. This created a huge dust cloud that was blowing my way.

Above: So I carried the frame still dangling from the Park PCS work stand by bailing wire back into the shop and parked in the corner again. So it goes...

Above: About a week ago I found this 1980's Giant rigid woman's mountain bike. I have a good reason to be happy to have found this pink Giant rigid. But I will get to that in a little bit.


Above: My regular blog followers might remember the rear brake set up on Laura's Trek. Particularly the lever set up that required a two piece brake cable and a knarp. I described it as "engineering designed to impress" rather than to actually improve performance". I thought it was silly then, and I still do. But what brought that to mind after all this time?

Above: This set up is what got me thinking about Laura's Trek again. Simplicity is a beautiful thing. Here is the rear brake cable pulley on the woman's Giant rigid mountain bike. The Raleighesque pulley wheel is removable for replacement. One continuous cable directly (indirectly might be a better word) connected to the cable hanger. And if your wondering about performance? Yes it functions beautifully, even after years untouched in storage. Of course the brake shoes are hard as a rock. But that is to be expected.

Above: While I am on the subject of simple and serviceable engineering that works really well.. You gotta love these Shimano SIS thumb shifters. Not very impressive, but reliable as they could possibly be. And very easy to replace the shift cable or the entire unit for that mattter. Well I can see why they got rid of these damn things. They just made too much sense. God forbid anyone would want a simple system that works great and is really easy to service. I have met other casual cyclists like myself who also prefer these simple and reliable shifters. But just why did I buy this Pink bike anyway? My God, it Is bloody ugly! But also beautiful in it's functional and serviceable simplicity. However, in the past I have not had much luck finding new homes for obnoxiously Pink bikes.
Above: With the exception of the Pink Mongoose Freestyle Girl a bike that went rather quickly. But it was in "like new" condition and was priced to move. I did not make any money on that bike, but at least I didn't loose any either. OK back to the question,so why did I buy this "not so perfect" pink Giant mountain bike?

Above: When looking at the pink 1980's Ladies Giant.. I thought wow! I bet I can salvage enough off this bike to pretty much build the Orange 1980'S Men's Giant rigid frame bike (BLACK ARROW) that has been hanging from the Garage/Shop wall for "God only knows how long". And just maybe I can finally make good use of the new crank (RED ARROW) that is still on the left over "parts bike" from the for mentioned Laura's Trek build. At this point I am picturing (in my mind) a pretty sweet looking little rigid frame mountain bike. I am thinking about using some "high volume phat on/off road tires" like on the chrome Raleigh Teton. A hell of a good idea, if I may say so myself.

Above: The front and rear 26 inch FEMCO wheels spin straight with no noticeable grind or wobble. They appear to be in excellent condition. I will still check both wheels for true. Then I will break down the axles and inspect the axle, cones and bearings then clean and re grease everything.

Above: The front axle has a quick release skewer (always a good thing) and the hub looks like it will polish up nicely with a little "Mother's Mag and Aluminum Polish". I noticed the front wheel was on backwards with the skewer lever on the drive side. But the cyclometer is set up for the wheel being on backwards, So for now I will just flip it back around.

Above: If the Cyclometer works I may use it on the build. Or possibly even install it on the 29'er.
Above: The handlebars, shifters, brake levers and possibly the grips will all be reused. (I might upgrade the grips) But if I want to reuse this stem, I will need to "make like Mick Jagger" and Paint it Black.

Above: The rear derailleur is ok, but I might have a better salvaged unit in my rear derailleur tub. If I remember right... the orange Giant has a threaded rear derailleur mount hole on the drop out. No doubt a higher end model than the Pink Giant.

Above: The front derailleur also appears to be very "entry level". But... If it cleans up nicely and functions well, I may reuse it. Again I will have to see what I have available in the salvaged front derailleur tub.

Above: This was a good plan, and still is. But the other day while I was raking stones off our freshly graded front yard, a friend called. He said something like "Hugh I have a couple bikes for you, they were in a customers basement. They have been trying to give them to me for years, so I finally loaded them up. Are you interested?" My answer: "Yes I am definitely interested". So here is one of them, a Men's 3 Speed "All-Pro" (K Mart Bike). This pic was taken after a few hours of clean up. It handled the long term storage pretty well. All except for the rims that is.

Above: Here is a shot of "the rustiest part" of the front rim. This one I probably have a suitable replacement for. I have a Woman's Fuji 3 speed I have been stealing parts off for years. I would consider using the rear wheel as well, but the shift mechanism is on the opposite side of the rear hub.

Above: Here is the same shot of the rear rim. This wheel I do not have a suitable replacement for. I think I will brass wheel-brush both rims and polish them both up. And then I will decide if I need to replace them. I have a Wald front wire basket that I am sure will fit up front. And a Schwinn collapsible rear two sided basket (saddlebag style) that I might be able to retro fit. So basically I will be building a "delivery bike".

The same moisture that was bad for the rims, seems to have been good for the tires. They are in incredible shape considering, no visible cracking whatsoever. (Not visible until I got a good look at the digital photographs that is) There appears to be some cracking in the treads. I guess the tires could be replacements. But I doubt it, as everything else looks very much original. UPDATE: As of July 4th 2013 the tires are still holding air and maintaining pressure.
Above: I will be on vacation next week. I will try once again to update the blog from the island using my Dell lap top. I did not have any success accessing the net last year. This year I will find someone at the hotel to show me how to use the free Wi-Fi. Your not supposed to mention on face book when you are going to be on vacation. But the house will not be vacant my son will be staying at the house and taking care the place and the cats and critters.

As I am typing this our vacation has already begun and we will be driving up to Mackinac Island in the morning. I might just haul the Kalkhoff folding bike the trunk. I would like to see how it compares to bringing along a full size bike. Is the convenience really worth giving up a full size bike for a week? As I would not have to assemble it in the parking lot at the ferry service. Or worry about my new 29'er sitting out in the elements for a week.

Above: I took a break from writing this post and went out to the shop/garage for a while just to see if the collapsible rear baskets/rack would fit the 3 speed. As sometimes happens I kept on going wanting to see if the Wald front basket would also fit. Obviously it did :)

Above: After converting the stem mounted front reflector bracket to an extra mounting bracket for the Wald basket I decided to make up a basket mounted reflector bracket for the front reflector. I used some left over rear rack mounting hardware to fashion this reflector mount bracket. It took a little trial and error as well as some hack sawing and hammering and filing. But eventually I came up with something that should work. (and hold up) When finished I cut off the extra threads from the bolt so it would not snag on anything that might be placed into the basket in the future. For this cut I used the rotary tool with a mini cutting wheel.

Above: The rear collapsible baskets and clipped into position. Do not let the pictures fool you, there is still much work to do on this bike before it goes to work. But it will have to wait until we return from our holiday.
Until Next Time Please RIDE SAFELY and Remember to Always...RESCUE, RESTORE & RECYCLE
Cheers, Hugh

Bicycling on Macknac Island 2013

$
0
0
Hello and Welcome,
Carolyn and I returned home Sat June 29th after a wonderful vacation week on Mackinac island. There was lots of good food, carriage rides and sightseeing. And of course lots of bicycle riding for me. Carolyn was able to do some horseback riding on the island as well.

Above: If you are staying on the island you will probably want to use the services of one of the many bicycle porters on the island. The porters are incredible cyclists maneuvering through pedestrians, horse and buggy traffic and visiting cyclists. (many of whom appear to be inexperienced and totally oblivious to anything going on around them) And they do this usually with heavy loads of luggage on their bikes. And they make it look easy, and I am sure it is anything but. In our experience the porters have all been very polite and extremely helpful.

Above: I brought along the 3 speed Kalkhoff folding bike that I restored this past winter. I have no real experience traveling with a folding bike, so I thought I would give it a try. And maybe learn a few things from the experience. The first thing that occurred to me was that folding pedals would have been an excellent idea. This would allow the bike to lay flatter on the floor of the trunk. I should also mention this is a subcompact Ford Fiesta with a very small trunk. I was impressed by how easily the bike fit into the trunk. I could have loosened the handlebar clamp and seat-post/seat-tube clamp and made the bike even more compact if necessary. We folded down the rear seats to make room for our luggage. The ferry company will haul your bike but there is a charge for it. Our two round trip ferry tickets were 25.00 each and an additional 8.00 for the bike. (also round trip)

Above: This fancy coach is from the world famous Grand Hotel. We stayed at the Lilac Tree Hotel. The Grand is a little "too grand" for me. But if you like luxury and dressing up for dinner it might be the place for you.

Above: The Lilac Tree has bike rack parking in the rear of the building. However you can also park your bike inside on the ground level if you like. (check with the front desk first)

Above: I forgot my lock again this year. But I did purchased a SERFAS cable lock from the Mackinac Bike Barn on Main Street. They are a bike rental outfit as well as a full service bike shop. And I thought $21.99 was a fair price for the lock "considering where we were". They have different types of bikes for rent including Single speed Beach cruisers, seven speed comfort bikes, 21 speed Mountain Bikes or comfort bikes. They also offer single and multi speed Tandem bikes and tag along bikes as well child or adult strollers. They also carry quite a few cycling accessories. These are very helpful and knowledgeable folks so stop in even if just to say hello.

Above: The early morning view from our suite's balcony. If this view looks familiar it is the same room we stayed in last year.

Above: I told myself I would not take pictures of the stone monuments built by visitors along the shoreline this year. But when I saw this arch built off shore while on one of my morning rides around the island... I could not resist.

Above: Folks on the island are for the most part pretty laid back. This is one of the few signs I have seen displaying any cycling rules on the island. Also I have never seen a bike parked or ridden on the sidewalk, so I assume those are unwritten rules as well. Also no bikes can be left out on the street at night. And although someone has removed the sign, there are still no bikes allowed in rooms at the Lilac Tree Hotel.

Above: This Seagull just happens to be perched upon one of those monuments I am not photographing this year. Technically this is just a photograph of a bird or "waterfowl" might be a better word choice. Just in case you didn't pick up on it, this part of the post is about my rides around the island :)

Above: This sign is posted on the wall at a roadside hotdog stand located about half way around the island. If you are not familiar with Seagulls, they are master hotdog thieves. Years ago (when we still ate garbage) a Seagull swooped down and took a hotdog right out of my wife's hand when she was looking the other way.

Above: On this particular morning the Loons were not very active and I was able to get a few good photographs.

Above: One of the drivers or "teamsters" told me, Many of the people who come to the island never make it off Main street. And that is truly a shame because the wilderness or natural parts of the island are absolutely beautiful. The locals call these folks Fudgies because the Island is known for it`s many fudge shops on Main Street. They also have a Saunders on main street (a Detroit original) with the best ice cream you will ever taste anywhere. I think they have fudge too.

Above: These two Loons seem to be posing for this picture. I don`t know if they are nesting or just relaxing. Either way they sure are nice to look at.

Above: I wanted to get a photograph of "yours truly" sitting in this natural chair. But there was no one around to take the pic. I will make it a point to try it out next time:)

Above: There are a few picturesque rock formations along the roadside as well. This one appears to have a tree growing out of it.

Above: Another rock formation along the side of the road. If you really want to see rock formations in Michigan you will want to visit Munising located in Michigan's Upper Peninsula. And while you are there take the Painted Rock Boat Tour. And spend a day or two checking out the half dozen or so local waterfalls. I am looking forward to our next visit to the Munising area.

Above: Arch Rock is also visible from the road. Or if you do not ride, it is also a stop on the "mega Coach" tour. I had to use a pic from last years picture file. Somehow I totally missed it this trip.

Above: If you click on this pic to enlarge you might be able to see the carriage approaching from the road ahead. If you have the nerve you can also rent a carriage and a team and drive it yourself. Being a city boy at heart I decided to pass on that experience (for now).

Above: While stopping for a drink of Gatorade and to check out the woods a hiker named Wayne offered to take a picture for me. Wayne and I chatted for a few minutes and he told be he rides bikes (motorcycles). I told him I too rode "chrome horses" for 30+ years, but health issues put an end to that. Today Wayne was hiking with his wife as no motor vehicles are allowed on the island. So I guess that would make Wayne a "biker hiker". Sorry...lol

Above: Some folks do live on the island year round. Which is impressive, as the winters this far north can be brutal. So they have a school and a clinic with a certified emergency room and a grocery store. I was told the most common visit to the emergency room is the result of head wounds suffered by tourists on bikes with no bicycle helmets. After what I have seen riding around the island that is no real surprise.

Above: If you click on this pic to enlarge, you might be able to make out the Mackinac Bridge in the fog. If not you will have to trust me on that one.

Above: A picture of the old Round Island lighthouse (built in 1895) taken that same foggy morning on one of my bike rides. The building was restored in 1978 for use in the movie "Somewhere in Time".

Above: There are some modest homes on the island. This is not one of them :) If you hire a carriage and driver you just might hear some interesting stories about the former owners of these beautiful homes. But you won`t hear any from me.
Above: On this particular morning ride as I was finishing my ride around the island I spotted my darling wife with camera (Fuji FinePix S4800) in hand and she took this photograph. Thanks Carolyn, Your the best!

Above: As for the Kalkhoff folding bike, once I raised the seat post and stem it was actually fairly comfortable. And loading and unloading the bike was fairly simple, although some tools are required. I would imagine a more modern folding bike would be even easier to break down and set up. As for performance, the Sturmey Archer 3 speed hub functioned perfectly. The front wheel has a slight wobble which causes the front brake to intermittently rub ever so slightly. That problem I will correct when I get a chance. Would I bring along the folding bike again? If space was an issue and I was not planning on riding any great distance, then yes. But if I really wanted to ride a lot and for longer distances? Then of course I would choose another bike. But for what it is, the little Kalkhoff performed really well. But as they say "It is what It is" Now here are some more pics from our trip.

Above: Sunrise on Haldimand Bay

Above: J.L. Beanery right on the harbor. They make the best B.L.T. on the planet!

Above: Period dressed rein-actors at Fort Mackinac.

Above: Great Lakes Maritime Academy vessel coming out of the fog.

Above: Fountain in the Garden at the Grand Hotel. (in the background)

Above: A sailboat going through maneuvers. Possibly practicing for the racing season that starts this week.

Above: Bell and Star, the team that pulled our buggy around the island and their driver Jeramey. It turned out I had family in the upper peninsula town Jeramey grew up in.

Above: Another working bicycle. This fellow cleans up after the horses. I did finally wake up early enough to hear the crew fire hosing down Main street just before sunrise.

Above: The flag raised at the Fort

Above: A freighter passing by the harbor.

Above: A view from the Tea Room at the fort.

Above: A porter hard at work

Above: Sunrise on Main Street

Above: Resident of the Butterfly House

Above: The Lilac Hotel Mackinac Island

Above:Relaxing on Friday the 28th of June our last full day on the island. At this point I was ready to go home and start planning our next holiday.

Above: A special Thank You to my sometimes photographer and full time partner in life Carolyn. That pretty much covers our week on Mackinac Island. Until Next Time Please RIDE SAFELY and Remember to Always....RESCUE, RESTORE & RECYCLE
Cheers, Hugh

Gazelle Trimmer Trend and Batavus Champion

$
0
0
Hello and Welcome
On Wed July 10th I drove down to Troy Mi to get a look at two bikes that I was told by the picker were German. I will not give the pickers name as I carefully guard any info about about where I find my bikes. It was about a 45 minute drive, but when I got a look at what my picker had found I was glad I made the trip.

Above: The Gazelle "Trimmer Trend" step through frame commuter bike. The frame size is 54cm (o.c. crank to near top of seat tube clamp) And the frame length (o.c. head tube to o.c. seat tube) is 21 & 1/4 inches or 54 cm. This is my first Dutch bike and is very different from anything I have found before.

Above: Founded in 1892 by Willem Kolling & Rudolf Arentsen, Gazzelle is the biggest and most popular bicycle maker in the Netherlands. When I checked on the Gazelle web site their was no link to any US outlets. That is not to say they are not available here in the USA. I would imagine someone is importing them here for resale.

Above: As you can see the Generator light and parts of the mounting bracket are badly rusted. I might have a replacement for the generator/light on hand. I have only seen pics of bikes with this type front brake. This one is not hooked up to the cable. I hope I can locate some detail pics of the brake and how it is supposed to be connected to the cable.

Above: I really like the Euro look of the wrap around chain guard. Again the rear hub and brake look totally foreign to me. I am glad I have a few other projects to finish before I start this project. I'll definitely need the time to do some research.

Above: A shot of the rear hub and brake hook up. (I think it might be a Sturmey Archer hub) brb..... Ok I just ran out to the shop to make some notes. The Hub markings are as follows "Sturmey Archer - STEELITE - Made in England - 87 or B7" The strap (that one that looks like it is for securing loads) is wrapped around the hub along with some tall grass. But the brake does work when activated by pulling the lever (on the hub) manually. As does the front brake. That's a good start anyway.

Above: I can easily imagine how nice this bike must have looked the day it first rolled out of the shop. The rack is simple but sturdy with very good quality chrome plating. I have no doubt the rack will clean up beautifully. The bike appears to be a very nice mating of form and function. It is already easy to see why these bikes are held in such high regard here and apparently everywhere else!

Above: The bell is rusty and sticks a little bit, but I think I can get it working and shining again. The plastic plate has been broken off the Sturmey Archer shifter housing. The shifter itself is completely frozen with rust and will need to be replaced for sure. The brake cables are almost completely frozen and will definitely need to be replaced. I am assuming it is a three speed hub, but I guess it could have more than 3 gear selections. If you know the answers to any of these questions I am asking myself, Please leave a comment.

Above: Sweet head badge! I get the Gazelle part. I am going to see if I can get the other part translated brb.... RiJWIEL FABRIEK (Bicycle Factory) DIEREN (Town in the Netherlands) This was confirmed by a regular reader and long time follower Everett, whom I believe works at the D.I.A. (Detroit Institute of Arts) I have not been to the DIA since I was a kid about 40+ years ago. But I remember it was awesome!

Above: As popular as these bikes are I would think decals should not be too difficult to locate. brb... (again) Ok I have already located two sets. They are not exactly the same, but it is a good sign. I found these in just a few minutes. And I could do a combination of those decals and also have some made up. At any rate, I do not think decals will be a problem. Brakes... Now those might be a problem:)

Above: The Batavus Champion. Same picker, same day same price. (don't ask) The handlebars on this bike alone would have been worth the trip. And a skirt guard too. This is one cool little bike.

Above: If I'm lying, I'm dying These handlebars are fantastic! I might have to save these for a future project. I can see these bars on a lugged frame, single speed, vintage style "bare bones" board racer with white tires.

Above: This rack does not appear to be quite as sturdy as the rack on the Gazelle however the rear fender looks a lot straighter. The taillight and rack mounted reflector look very similar.

Above: The Batavus head badge. I think I will try to clean it up a bit using Mother's Mag and Aluminum Polish. I know nothing about Batavus except what I have learned in the last few minutes. From Batavus: "Batavus is the bike specialist from The Netherlands for all sorts of bikes, including the popular e-bike". From Wikipedia: I have learned in 1904 founder Andries Gaastra sold clocks and small farm machines from his shop. Soon after he began selling bikes built by German manufacturer Presto. Not long after that Andries began building and selling bikes under the BATAVUS brand. It makes sense to me that a man with a background in clocks and farm machinery would be the sort of fellow who could produce technically superior and reliable bikes.

Above: This horseshoe shaped wheel lock is in the locked position. The lever won't budge, I think I need a key of sorts to unlock it before the lever will move.

Above: I suspect a key or tool of some sort is inserted into this hole (red arrow) to allow the unlocking lever to be pulled. In the mean time I will spray a little WD 40 in there to free things up a bit. I ran across a similar wheel lock before. But the last one was stuck in the open or unlocked position. I think it might have been on the KTM multi speed road bike.

Above: The skirt guard is missing a few of the tabs that hold it in place. I think I can still make it work though. I also spotted a crack in the seal on the left side of the crank. And I noticed like the Gazelle, there is a logo on the kickstand.

Above: I found the AXA site which has a online key service. The following is step one in the key service section: "Firstly you must fill out the key number of your key. You can find this on your spare key, the guarantee card, the steel disc or on your cycle insurance policy. If you no longer have a key number you cannot order a new key and you will have to buy a new lock. The number comprises of at least four characters and at most six. The key number of your key:"
LTMS Are You ####ing Kidding Me? Any chance the numbers engraved on the back of the lock housing might help? So it goes.....

Above: Thursday morning I rode the Diamondback 29'er into town to get a haircut at the world famous Jack's Barber Shop. I have only had two barbers in my entire life. When I first moved out here from the old neighborhood I would drive back to the old neighborhood barber shop on 4th street every couple months for a haircut. Finally I decided to ask around and try something local. And I have been a loyal customer at Jack's ever since. We have one of those discount barbershops now where you can get a haircut for under ten bucks. But your hair will look like you only paid five bucks..ltms. Besides I like to catch up with a the local goings on and talk hockey with Tommy. I don't think you get the small town treatment at the discount place. This past week the humidity came down quite a bit and we've had nice riding weather. But I hear the temp is about to go back up along with the humidity. So tomorrow morning might be my last chance for a comfortable morning ride for a while. I am still riding the 29'er exclusively since we got back from our Island holiday. I just love riding that bike!

Above: Something ran into the front left wheel on the Taurus when it was parked. Besides trashing the hubcap it knocked the front end much farther out of wack. I drove it on the expressway before I noticed the damage and it felt like the whole front end was coming apart at 65 mph. It already needed new tie rod ends and a new power steering pump. And the trans has been shifting really hard into second for about two years now. I had adjusted my driving to avoid the hard shift into second, so that was not really a problem. But I think it might be time to retire the old Taurus. We have decided we are going to donate it to the Purple Heart. Twenty six years old and in the family since it was new, the old Taurus has served this family well since 1987. So we might be purchasing our son's Mazda 3 (He's ready for a change) or we might end up buying new. Totally undecided at this point.

Above: Nothing new to report on the All Pro 3 speed delivery bike project. Or the Zebrakenko project for that matter. But the kitchen remodel is finished! And the front yard is ready for seed (new septic field). Also the new laundry area (stacked) and closet is supposed to go in Tuesday or Wednesday. This summer has mostly been about the house. But soon it will be finished (for a while anyway) and I can once again concentrate on the bikes. At least until the living room project starts. So it goes...

Above: Eddie is doing fine, He's still a pain in the a$$. Until next time Please Ride Safely and Remember to Always....RESCUE, RESTORE & RECYCLE
Cheers, Hugh

MOTIV RockRidge Mountain Bike

$
0
0
Hello and Welcome,
Well we are done working on the house, for a while anyway. So hopefully I can get back to repairing and or restoring bicycles. A while back a friend asked me about doing some work on a bike he was cleaning up for his son. This bike will be used as a campus bike, at least I think that was the idea. Anyway, it took a little while but the bike finally made it here. As always it needed a little more work than I originally thought.

Above: I was only supposed the replace the shifter for the rear derailleur, but when I test rode the bike this front "D" shifter was not working at all. So I guess I will be replacing both. Which is what I would rather do anyway as we are changing to a simple and reliable Shimano thumb shifter set up.

Above: The soon to be replaced shifter for the rear derailleur. This one is totally 100% seized-up. This is not really a project So I did not take as many pics as usual. So for most of the "before stuff" you will just have to take my word for it.

Above: Here I have installed the new (salvaged) shifters I also replaced the cables and housings as well, using Jag Wire basics cable w housing. I did however reuse the short cable housing at the rear derailleur. Of course I added a few drops of oil before inserting the new cable. At any rate both shifters are working fine. And the rear d shifter is SIS just like the original. S.I.S. = Shimano Index Shifting. You know..... click, click, click. At least on this rear d shifter. You can turn off the SIS if you are so inclined.

Above: I have a tub full of salvaged reflectors, so I went ahead and installed a front reflector. I also covered up the rust on the bars using 3M plastic trim and detail tape. (which I think is no longer available)

Above: Since I had to remove the grips anyway, I took them inside and scrubbed them down using hand soap and the old fingernail brush. They were really grimy and really needed a good cleaning. To remove the grips I carefully inserted a small screwdriver and sprayed a little WD40 in between the bar and inside of the grips. I have used soapy water in the past and it works well too. But this is quicker and more convenient, as I always have a can of WD40 close by. I picked up this method from one of my blog followers, I don`t remember who it was though.

I also trued both wheels on the Truing Stand. The rear wheel looked to be beyond truing. But it actually trued-up quite nicely to within about 1/16th of an inch. The rear brake was "maladjusted" to accommodate the wobbling back wheel. So after reinstalling the rear wheel I replaced the cable and the front part of the cable housing. Then I reset the the brake pads or shoes correctly, and it stops really well now. Although it will need new shoes soon.

Above: I had this Bontredger rack laying around and I had already decided "the next bike that comes in that this rack fits properly I am just going to install it {for free} and be rid of it". The damn thing isn't doing me any good laying around, so why not just put it to good use?

Above: I noticed it had no bottle cage either, so I installed this salvaged Specialized cage. I will be donating this to the cause as well.

Above: Some of the spokes were rusty, so I sanded those down. The dust cap was missing on the drive side, so I installed a salvaged one (also donated). I could write a book on "How not to make money repairing bikes"..lol. Who gives a s#1% ! It can't always be about making money. Did I mention this bike is going to my hometown, which means it is probably for an O.C.C. student. Anyway the bike looks pretty good considering it's tight budget.

Above: I cleaned-up the sidewalls, rims and everything but the grips using Armor All Cleaning Wipes. So the only "new parts" I used were the cables and housings. The owner purchased the saddle. Everything else I used was salvaged so this bike truly is Recycled :)
Above: Here is a shot of that rear tire. When I first saw the bike the tires were at very low pressure about 25 psi. This did not happen (or wasn't visible) until I brought the tires up to 55 psi (they max at 65 psi). I will dig around the shop tomorrow, maybe I have something better that I can use. And I should mention, the front tire looks 100% better.

Above: Here is what I found the following morning. Even after dropping the pressure to 45 psi this tire blew out sometime during the night. Fortunately I do have a Kenda 26 x 1.95 black wall mountain bike tire. The one I have is definitely a front tire so I will have to move his more "aggressive tread" front tire to the rear. So I now needed to remove both front and rear tires to make this work out properly.

Above: Here I have replaced the front "paddle like tread" tire with my replacement. Note how the tread starts to make the curve up the sidewall of the tire a wee bit. This helps the tire grab better in the turns. A more modern version would have the tread even farther up the side wall. So far so good. Now I need to remove the blown out tire and tube from the rear wheel and replace them with the newer ones that were on the front.

Above: It is obvious that this tread pattern is better suited for the rear than my replacement would have been. I could have just replaced the rear tire with my tire but that would have looked stupid and not performed as well. At least in my humble opinion. Since I chose to bring the cracked tire up to pressure and it failed, I will only charge for the tire not the inner tube. I think that is a pretty fair deal.

above: Ok finished again :) I have bagged up all the parts I have replaced including the tire and inner tube. This is so I can show the customer exactly why each part was replaced. I have found that most people don't mind paying for parts and labor if you show them why it was necessary. This is especially important with new or first time customers. With most regular or repeat customers I do not need to do this. But it is always a good idea to offer to show the old parts and explain the expenses.

Above: It was a little stressful having so much work done on the house this year, especially for my wife. So I put up some Hummingbird feeders to bring back a little peace. It has worked pretty well and we both enjoy watching these tiny birds hover around the feeders and flowers.

Above: The Ducks have returned this year and we have seen more Rabbits than in recent years. The Hawks and Feral Cats (Felis Catus) have kept the Chipmunk population in check. The Hawks seem to prefer the state land for nesting the past few years. I hear them occasionally but rarely see them anymore. If the Chipmunk and Rabbit population increases the Hawks will surely return.
Until Next time Please RIDE SAFELY and Remember to Always.....RESCUE,RESTORE & RECYCLE
Cheers, Hugh

TRIAX PK 7 Mountain Bike

$
0
0
Hello and Welcome
One day I will remember this season as "The Summer of the Department Store Mountain Bike". It started with the RHINO then the MOTIV now the TRIAX PK 7. This bike needs a new back wheel, a better kickstand and a nicer saddle and some serious rust removal for the chain.

Above: The rear wheel proved to be beyond truing. I have not yet stripped the woman's GIANT Acapulco. But I did salvage the front tire for the Motiv. Which did not affect the future of the GIANT Acapulco as it had miss matched tires anyway. But salvaging one of the wheels has sealed it's fate. It will now be just another parts bike. And that's ok because I really needed another frame hanging from the garage/shop rafters.

Above: The aforementioned Ladies GIANT Mountain bike. I should have been stealing the tires off the TRIAX to finish this bike. But this is not the bike I am being asked to repair. So it goes...

Above: The FEMCO wheel worked out perfectly:) No need to swap free wheels or do any truing. So that solves the main problem. But the kickstand situation is a little weird. The mounting plate for the kickstand is mounted under the front of the swing arm. The only problem is the mounting plate is not on a level plane with the ground. So when you mount a kickstand on it the stand swings much farther forward than usual. And you could see the result of this set up looking at the grip ends. (I have a plan for those too) But I was sure I had a salvaged rear triangle mount kickstand somewhere in the shop.

Above: I could not make the original mounting bracket work. As I remember it was not fitted very well on the parts bike it came off of either. So I cut off the upper part of the sliding bracket with my hacksaw then used a typical bracket for tubing. You should be able to find these at any "real hardware store". I was able to use the original holes in the sliding bracket so no drilling was necessary. This worked out pretty well, as the bike stands up much straighter now.

Above: As is typical for a bike that has been dropped or fallen over several times the handlebar ends had cut through the ends of the grips. A cheap fix is to just cut out the remaining grip-end even with the end of the handlebar. Then just install a normal end plug. Not perfect by any means, but none the less an improvement.

Above: This always goes hand in hand with the damaged grip ends, the sides of the saddle tore up from the bike falling over or being dropped several times. In this case I suspect the crappy kickstand was the culprit. Don't you just cringe when you see some kid deliberately drop his bike on the pavement? I would never do that to my Candy Blue Schwinn Sting Ray when I was a kid. And God save me if my Dad ever saw me doing that!

Above: Here I have installed the unused saddle from the parts bike that was left over from Laura's Trek winter commuter build.

Above: Another typical thing you see on used department store bikes is frayed (unwound) cable ends. Here I just snipped off the worst of it using cable cutters. Then I rewound it "as best I could" and crimped on a cable end. I don`t know if the bike is worth all this love, but it just something I like to do. Cost? about 1 penny.

Above: As for the chain, I just sprayed it (in sections) with WD-40 and wiped it down vigorously using a terry cloth rag. The chain rust (surface rust) was not as bad as I originally thought. After it dries I will lube the chain with some White Lightning chain lubricant. As for the rest, it just needed to be wiped down with Armor All Cleaning wipes. I did take some slack out of the rear brake cable and reposition the shoes as well. I think it looks pretty good. For what it is anyway.

Above: The left side of the TRIAX. The red arrow indicates where the kickstand mounting plate is located. If you enlarge the pic you can see how the swing arm sweeps upward at this point. And I should mention, I did instal a Greenfield Alloy kickstand and the same thing happened. So the problem definitely was not with the cheesy kickstand, which is what I suspected at first. After a little cleaning I returned the bike to it's owner (who would like to remain anonymous) But she was very pleased and surprised that it came out so nice.

Above: We are finally retiring the 1987 Ford Taurus. It has been in the family since it was new. And for the most part the Taurus has been a good reliable car. But after 26 years it needs more in repairs and maintenance than it is worth. And the gas consumption is unacceptable even though I drive much less than 10 thousand miles per year. We are donating the old Taurus to The Purple Heart of Michigan.

Above: I will now be driving a 2007 Mazda 3, which also has been in the family since new. I have been really enjoying driving the Mazda so far. And I feel better about using much less petro (about 1/2) than the old Taurus. And did I mention the Mazda is a Blast to drive? Zoom Zoom Zoom! It looks like I am going to need a new bike rack for the Mazda. I do not think it would be wise to hook the straps to the Mazada's plastic rear bumper. I think a roof top rack might be the best way to go. This will also give me quick and easy access the trunk (boot). No more "on and off" with the rack every time I want to haul something.

We purchased the Mazda 3 from our son who just purchased the first 2014 Yaris SE (above) in Michigan. "at least that is what we were told". I really like the look of the Yaris SE and I know my son really loves the car. The Mazda is not my "mid life crisis".... I am too old for that :) I had mine when I turned 50 and purchased a 1985 Outlaw V MAX. That was tons of fun too!
Until next time, Please RIDE SAFELY and Remember to Always RESCUE, RESTORE & RECYCLE
Cheers, Hugh

My Bicycle "Bucket List" Part One

$
0
0
Hello and Welcome,
I think every bicycle enthusiast has a list of bikes he or she would like to own at some point before they leave this world. Probably not written down but filed away somewhere in the back his or her mind. If your list is anything like mine it has been periodically updated over the years. So I will start with a few bikes that have been on my "bucket list" for quite a while.

ABOVE: Antique replica "Bone Shaker 52" from worksmancycles.com
The penny farthing or high wheel bicycle. The penny farthing is not a bike I would necessarily want to ride much. I consider it more of a piece of art that I would put on display somewhere to admire it. I read somewhere long ago that the name "penny farthing" comes from the coins. The difference in the size of the front and rear wheels being on about the same scale as the difference in the size of a farthing and a penny.


Above: The Schwinn Orange Krate has probably been on my bicycle bucket list the longest. I have already owned a regular Schwinn Sting Ray that I received for my 11th birthday. I loved my candy blue Sting Ray and I thought it was the coolest bike on the planet at the time. That is until I saw the Orange Krate. It truly was love at first sight. I probably could have saved up to purchase one with my paper route earnings. But at that time Hockey was the most important thing I had going on. And I paid for all of my hockey equipment and "ice time" myself. There just was not enough money for both. I really should have found a way.....So it goes

ABOVE: The Raleigh Competition MK II DL 165. My brother George rode one of the original purple Raleigh Competitions back in the early 1970's. (not the MK II) I rode his a few times and was impressed by how it felt. The tires were the high pressure sew up type. And the Raleigh weighed nothing compared to my Schwinn. And it felt like a finely crafted machine when I rode it, a feeling I had never experienced riding before. It was the Raleigh that started my love affair with ten speed road racers. As much as I liked my bro's bike, I think I would like the MK II model DL 165 even better.

Above: The Schwinn Phantom considered by many to be the most beautiful of the American tank bikes. I must say I do agree. I do not think the tank bike ever got any better than the Schwinn Phantom. (custom builds excluded) I did not appreciate the beauty of this style bike when I was a boy. But back then most of the tank bikes I saw were just "old clunkers". I was after all part of the "Sting Ray generation". But with age comes wisdom (well some wisdom hopefully) and I can now appreciate the beauty of this extraordinary bicycle.

Above: From the Motobecane 1984 catalog, on the left a black and red Motobecane Super Mirage. I did actually own one of these for a short time. Unfortunately it had a smaller frame. I prefer a 57 to 58 cm frame but I have been known to go bigger on occasion. I think the red and black color combination was the best Motobecane ever offered. Just a really classy looking bike. I hope I get another shot at restoring one of these beauties one day.

Above: A red Specialized Langster fixed gear bike. I had a chance to purchase one of these new a few years back. It had been "marked down" as the fixed gear bikes were just not selling at my friend Ernie's store. I thought about it a little too long, when I called back to have them hold it for me it had already sold. I was not really determined enough to search out another bike on close out. But I have always regretted that I missed the boat on this one. I thought it was a beautiful bike then and I still do.

Above: A Gazelle commuter bike. This is a style bike I have more recently come to appreciate. Again maybe not a bike I would ride very much (I really love my Diamondback 29'er) but a wonderful blend of form and function. And the step through model has a really beautifully designed frame as well. It is the only full size step through frame bike I would like to own.
above: The Gazelle with step through frame. I can just picture my wife and I riding around town on these two classic beauties. Unfortunately my wife does not ride, ok maybe me and Jennifer Aniston. The lovely Jennifer once worked as a bicycle messenger. So it's not totally out of the realm of possibilities. ok yeah it is :)

Above: My vintage Raliegh Sprite (sold) in ivory with original paint and decals. I was lucky enough to own this beauty and unlucky enough to find one that was too tall for me to ride comfortably. I would love to own this bike again in my correct size.

Above: A Cervelo P3 Carbon racer. As much as a bike like this is way too much bike for me, I can not help being impressed by the style and the technology. These bikes are truly works of art, as well as examples of incredible engineering and technology. But in reality, me owning a bike like this would be silly and a huge waste of machinery. Maybe if I were 30 or 40 years younger it would be a wise choice. But that boat has sailed...

Above: Photo courtesy of ryansrebuilds.blogspot.com
Ryan's 1970's Peugeot UO 8 . I would love to restore another vintage Peugeot road bike. That is providing everything threaded is salvageable. Finding old french thread components can be difficult and pricey. I do not specify a model that I would like to restore because you don't see these often around here. So I would have to take what I get or again spends lots of cash. And that ain't happening. You can read more about this restoration at ryansrebuilds.blogspot.com
Well Done Ryan!
Above: Photo courtesy of GT and Performance Bike. The GT Wheels 4 Life Tour Commuter is one sweet bike. There are many things I like about this bike, so I`ll just name a few. The paint color is excellent (sort of an English racing green) The triple triangle frame is legendary for it`s durability. The disc brakes provide excellent braking. I like the look and functionality of the fenders. The gold anodized rims compliment the paint perfectly. And the old style toe clips fit in perfectly with this blend of old style and modern era technology. And the bar end shifters are very retro-cool. I love the touring bars as well. I am picturing this bike with a Brooks coil sprung touring saddle and a set of old style riser handlebars. Although that might require changing the shifters as well. In that case I would probably install Shimano SIS top mount thumb shifters.

Above: Photograph from the 1974 Schwinn catalog. I owned 4 or 5 unicycles in my life time but never a Chicago Schwinn Unicycle. The last time I rode a uni it did not go well. One of the pedal spindles was bent and it really threw me off. (not literally) My first uni was a Montgomery Wards and it actually performed really well. The others I really don't remember. And the one I have now (bent pedal spindle) is of lower quality than the others.

Above: A 1977 Schwinn Approved Volare. I would love to own one of the Schwinn Approved Lightweights with chrome lugs. I have recently learned that Schwinn had more than one model that sported the chrome lugs. I think I would prefer the Schwinn Approved World Voyageur with the bar cons. But there might be other models that also have the bar cons. I am by no means a "Schwinn expert" and do not claim to be. I just love to restore and recycle old bikes. And I am also a big fan of some of the new bikes as well.

Above: The Firestone 500 bicycle. My friend Mike had one of these when I was a kid, although it might have been his brother Ron's bike. I remember riding on the handlebars trying to keep my feet out of the spokes! It might have been purchased at Ned's Firestone in my hometown of RoyalOak Mi. The "space age" tank bikes were the last of their kind until they started building retro tank bikes latter on. They typically had the tapered tank with the dual headlights. Not unlike the Roadmaster "Star Rider" I restored a while back. This Firestone 500 is not all that remarkable, but it does bring back some fond childhood memories.

Above: A homemade tall bike. photo courtesy of desertnewsdotcom. The design of this homemade "tall bike" is different from the ones I remember seeing around Metro Detroit when I was but a wee lad. The bikes I remember were built on an inverted frame (upside down) and involved lots of welding. I think I like this design better. Why do I want one? I have no idea. It just looks like fun.

From a dialog I had with reader/follower Abner M on the Blog's Face Book page.
At one time I thought the high-wheel or penny farthing riders were showing off when they coasted down hill with their feet up and over the handlebars. It turns out, they do this for safety. If they strike an object that stops the front wheel, they are catapulted forward. With their legs up and over the bars they can at least hit the ground running. As compared to being pile driven head first into the pavement. After I heard that, the idea of owning one did not sound all that wonderful anymore. There is a reason the bicycle evolved

As this "Bicycle Bucket List" is constantly changing, I will at some point post a part two. Until next time...Please RIDE SAFELY and Remember to Always RESCUE, RESTORE & RECYCLE
Cheers, Hugh

3 Speed "Delivery Bike" Project Finished

$
0
0
Hello and Welcome,
This project came together by chance or fate or whatever you want to call it. After a friend brought me the All Pro 3 speed (All Pro was a bicycle brand sold at K Mart) I got the idea of trying to see if the Schwinn rack with the folding rear mounted baskets would fit the All Pro. I received the rack as part of my payment for building Laura's Trek winter commuter late last fall.

Above: The All Pro 3 Speed Bicycle as it arrived in what appears to be all original condition. At this point all I had done was clean up the bike using Armor All Cleaning Wipes. The only part missing was the front head mount front reflector.

Above: As it turned out the rear rack with baskets was a near perfect fit. This is when the "Delivery Bike" idea occurred to be. I had hanging from the ceiling rafters a Huffy ten speed with drop bars and a Wald front wire basketmounted on the front. Which I think looked real stupid on the "road bike style" bike. I do not recall ever seeing a Wald front basket attached to drop handlebars before. Although being it was a Huffy I guess it really does not matter.

Above: The All Pro 3 Speed with both rack and front wire basket mounted. At this point the bike looks pretty fair, but the old Fuji Camera is kind to old bikes. This bike actually is going to need a little work before it is ready to deliver newspapers or pizza.

Above: Here is a closer look at the front 26 inch rim. Not looking to good and this is the better of the two rims. Both rims will need rust removal and truing for sure.

Above: As one observant reader noticed, on closer inspection these tires look like they are ready to split between the treads. Although the sidewalls look pretty good these tires are not going to hold up under a load. If this is really going to be a utility bicycle it is going to need some new rubber.

Above: The side wall size information reads 26 X 1 3/8 . But what really gets my attention is this marking (fits EA 3 Rim). This is something I will make sure to look for (in the specs) when searching for new tires online. So when I search 26 X 1 3/8 Bicycle Tire fits EA 3 . I come up with Kenda K40 Road Tire 26 X 1 3/8 Black* - Steel* fits EA3 E3 and 650A (French). Now that sounds like a perfect match to me, so I went ahead and placed the order. Black* indicates a black wall tire. Steel* indicates wire bead. I know I mention this a lot, But when ordering tires if yours are fractional like 26 X 1 1/4 DO NOT ORDER 26 X 1.25 they are not the same. And if your tire info indicates a specific rim type make sure the tire you order indicates the same rim type. Again they are not all the same. Sheldon Brown has an excellent article about proper tire sizing. I think I will add it to the Links List in the right column of This Blog.

Above: Here is the tag off one of the new tires. Notice it is fractional (26 x 1 3/8) like the originals. And there are the ISO numbers (37-590) As luck would have it I only had the 597 ISO tires in stock. It also indicates that it was a wire bead just like the originals. Also the price on the tag indicates that I got a pretty good deal on these, as I paid considerably less than the $21.70 msrp indicated. They fit the rims nice and snug. I am always suspicious of a tire goes on a little too easy.

Above: In the first photographs all I had done was wipe the rims and tires off with Armor All Cleaning Wipes. This pic shows the rim after hitting it with the brass detail brush as well as the Vermont American fine brass wheel brush. And then polishing it with Turtle Wax Chrome Cleaner Polish. The rear wheel was worse (rust wise) than the front and I am amazed by how well it cleaned up. I`ll have to get some pics of the rear wheel tomorrow after I mount the tire.

Above: Since the initial clean up I have replaced the original brake shoes with Jag Wire X Caliper Brake Shoes . I also replaced the original brake cables with Jag Wire Basics brake cables. Since the original cables were not rusty inside the original cable housings and the housings were not kinked or cracked I decided to re use them. Not for the cost but for the color, the original housings are brown. However if they had shown any cracking or rust I would have replaced them regardless of color.

Above: Using my entry level Minoura wheel truing stand both the front are rear wheels trued up nicely with very little effort. I expected at least some of the spoke nipples would be froze up, but they all turned easily. As is typical with really cheap wheels, a few of the spokes were very loose. I tightened the loose spokes "just enough to get the slack out" before truing the wheels. And I was amazed to see the wheel bearings had been greased at some point. Normally I find the bearings on the cheaper bikes to be void of any grease. Which no doubt explains why both the threaded headset and one piece single crankset are very smooth. I will of course check them both anyway. It will "probably" be just a matter of smearing a little fresh grease on the bearings and closing things back up.

Above: This pick shows the badly bent left strut or leg on the rear bicycle rack. In case you can not read the caption, I straightened it by grasping it at the center of the bend and pulling Really Hard! Every once in a while the 32 years of laying brick comes in handy :)

Above: Here is a shot of the rear wheel all cleaned up and sporting the new Kenda K40 road tire. At one point I was considering replacing the rear wheel. I did not have much hope it would clean up this nice. I will not be replacing the shift cable or 3 speed shifter, as they are both in fine condition. I am more likely not to replace a three speed shift cable if it looks to be in good condition. The reason for this is because the three speed cable is not under the high tension that a derailleur cable is. In other words (in my opinion) it does not work quite as hard. So I do not think it is likely to fail any time soon.

Above: As for the cheap @$$ rolled steel kick stand, there was never a doubt in my mind that I was going to replace this piece of junk. As is typical with really crappy kick stands, it wouldn't even hold the bike up very straight. The bike was always on the verge of falling over. It's off to the scrapper for this piece of garbage!

Above: I forgot to order a new stand when I ordered the tires. I found this old American made Greenfield alloy kickstand in the garage/shop. After some wheel brushing it looks 100% better than the original ever did.

Above: The left strut or leg (rear rack) after straightening. This is a huge improvement. But it might need one more good pull to get the rack centered over the rear fender (mud guard). I will try to replace this pic with a better one latter on.

Above: As my friends and relatives across the pond might say, The original cruiser saddle looks to be in pretty good nick. Besides it does match the cable housings and handlebar grips. It is a wee bit lose but that's an easy fix. So for now it stays.

Above: I will polish up the touring handlebars and levers a bit and give the saddle and grips a good cleaning. Then I have another idea for a horizontal Detroit News advertisement (sign) that I will hang from the top tube. I also need to get my old Detroit News "route book" (from 1969) out of my trunk. It might make a nice prop for my delivery bike.

Above: Here I am making a "Detroit News" sign that will hang from the top tube. It will need to dry over night before I can paint the other side. I purchased some stencils for the sign today. The red paint for the lettering might be a problem, I will probably have to purchase that as well.

Above: The sign is finished. Unfortunately the number and letter stencils were too large for the sign. I did however purchase these vinyl letters and numerals the same day "just in case". I think the vinyl worked out pretty good.

Above: I thought it might be better advertising to include additional information on the other side of the sign. Now I will see if I can find that old route book, I am sure it is in my Steamer Trunk with a few other things I managed to save from my youth.

Above: I do not know how old these metal route book covers are. But I was told by the paperboy "Dave" who passed them on to me when I took over his route (my second) that they were pretty old. A few years latter Dave and I worked together again on his Dad's brick crew. I heard Dave became a (union) projectionist. Which they told back then was a really sweet job. It had to be easier than the brick crew that's for sure.....ltms

Above: Overall I am pleased with the way the delivery bike turned out. I will probably do a little polishing and maybe make a few changes, but it is basically finished. Back then (and still today) there were two big Detroit Newspapers, The Detroit News and The Detroit FreePress. The FreePress boys were up early, about 6:00am picking up they're papers. I didn't want any part of that nonsense.

Above: The delivery bike from the other side. The FreePress made The News easy to sell. My sales pitch was to tell people you can read most of what is going to be in tomorrows FreePress today in The News. It stands to reason that a paper that is on your doorstep at 6:30am was probably "put to bed" (printed) in the middle of the night. But the FreePress did have some loyal readers and still does. To this day I wont read it! lol

The Detroit News was published 365 days a year. I think my Dad drove me on my route once on Christmas day. And that was only because we had to be somewhere else. Christmas was the best time to be a paperboy I think I made half my yearly earnings at Christmas time. Everyone tipped the paperboy at Christmas.

LEFT: Mrs MacArthur's house. One day while browsing real estate in my old neighborhood on the p.c. I spotted this house. Mrs MacArthur was my favorite customer on my paper route. She would sometimes have hot chocolate and fresh baked cookies for me. As I read the real estate add I noticed the house was only 700 and something sq feet. It did not look that small to me then. I think this was really where the idea of the Newspaper Boy delivery bike came from. Another customer gave me 5 dollars a week to walk his dog everyday on my paper route. One customer a poor widow lady had two sons who had turned her house into a "crash pad" (dope house) while she was working everyday. The boys had really trashed the place. I felt so bad for her I never collected for the paper. One day she caught me and asked my why I never came to collect. So I just told her the truth. She saw the American and Canadian flag patch on my shoulder and asked me, do you play hockey? I said yes I love hockey. She said come in I want to show you something. I was reluctant to go in, it smelled pretty bad in there. But the boys were not around so I did. She took me to a room that had Hockey Equipment scattered all over the floor. She said when the boys were young and their father was alive they played hockey. Then she said "take whatever you want". That was how I got my first real good pair of hockey gloves and elbow pads. I took good care of my customers and they in return took good care of me. It's funny, life was hard sometimes back then but it was also really really good.

Above: That's me a few years latter #12 wearing those Hockey Gloves and hockey elbow pads. And some hockey shorts I had outgrown a few years before. Until next time Please RIDE SAFELY and remember to Always....RESCUE, RESTORE & RECYCLE
Cheers, Hugh

MAGNA Mountain Bike / Is this Department Store Mountain Bike Thing Ever Going To End?

$
0
0
Hello and Welcome
As I mentioned in an earlier post, this year will forever be remembered by "yours truly" as The Summer of the Department Store Mountain Bike. This D.S.M.B. belongs to the son of a friend. I was told it needs a new shifter thingy for the front gear thing. (or something to that effect) ltms... I was sure I had a decent set of twist grip type shifters I saved from the LL Bean bike. And after this lad's mum told me this young man had given his other bike to a friend who badly needed one...well how do you say no to that?...... Right! You don't

Above: I hope you are on a Personal Computer or something with a big screen so you can click on this pic and see the labeling that I just recently learned how to do.

Above: The broken shifter is pretty simple, first I locate the replacement. Ok now I disconnect the cable from the front derailleur. I will then remove the short grip by carefully inserting a small slotted screwdriver and give it a quick shot of WD40 inside the grip. Ok the grip is off that was simple enough. Now I pull the shift cable free of any cable guides or braze-ons. For the twist shifter I locate the hole and insert the correct size Allen wrench and loosen the Allen screw or bolt. Now the shifter mechanism will slide right off the handlebars. Now for the sake of keeping it simple I kept the cables and housings with the salvaged twist shifters. So this is basically a remove and replace job. So now it is just a matter of sliding the new shifter into position and tightening it's Allen screw.

Above: Then I route the cable to the front derailleur using the original derailleur cable housings. I make sure the shifter is in the 1 or low position and I have no slack in the cable. And of course I have the chain on the small chain ring and with no cable the derailleur is in position over the small chainring. Now I attach the cable at the anchorpoint and try the shifter. Now it is working fine, so I can install the original short grip this will make it look more original. Remember the thin plastic washer that is probably on the floor goes between the short grip and the shifter. I'll adjust the shifter latter on, right now I have bigger fish to fry.

Above: When I spun the rear wheel it sounded like it was rubbing the frame. It was actually a bad bicycle wheel bearing and badly worn cone shown above. This is kind of cool... The replacement cone and bearing cartridge are both off his mom's bent rear wheel I recently replaced.

Above: On the left is the replacement bearing cartridge. On the right is the bad bearing cartridge. The bad one has been cleaned I suspect the bearings probably turned color as they overheated. The new bearings will be packed with grease before installing. And the axle and cones will get a little grease too. I like a light coat of grease on the axle to protect it from rust.

Above: I do not like the look of this bearing cup, but it feels pretty smooth so I'll use it for now. But I think I will be finding a good salvaged rear wheel and hub for this bike at some point in the future. As I think John mentioned on the face book page recently.... The one good thing about these D.S.M.B.'S is salvaged replacement parts are plentiful. And many of the parts are like new since these bikes are usually disabled so early in their lives. So I guess the message here is, If you can't fix it yourself you better learn fast or buy a better bike.

Above: While I have it off I'll clean up the 6 speed freewhee with a quick spray with White Lightning Clean Streak. And lubricate the free wheel by adding a few drops of oil to the gap and spinning the freewheel in my hand to let the oil work its way into the needle bearings.

Above: Here is the rear hub all back together and working really well. I checked back after a few days and the lad told his mum the bike is working great. I did do a small adjustment to the low (L) limit screw on the front derailleur before I took the bike back and it was working fine. I also had to take a wee bit of tension off the front derailleur cable to get it dialed in.

Above : As for the front hub, it just needed the cones adjusted (they were set a little too tight) and a little grease. The boy should notice this bike rolling 100% better than it was last time he rode it.

Above: The bike ready to go back home. As usual I have placed the worn or broken parts in a zip lock bag. A few other things I did were to reposition the brake levers and reflectors. The chain was lubed with the White Lightning self cleaning lube. And then I just cleaned up the bike a bit with Armor All Cleaning Wipes. Which reminds me I have to pick some up at Meijer's tomorrow.
Now I need to repair my friend Tom's rear wheel. Which ironically has almost the exact same problems. But it's NOT a Department Store Bike. Holeluuija!

Above: Tom's wheel off his Giant Mountain bike. I ran into Tom the other day and He said "Hey Hugh I got something for you". So he opens the trunk of his car and pulls out this rear wheel. Basically he said It needs a broken spoke replaced and could you take a look at the cones, I think they might be bad. I look at the Freewheel and see it is a Shimano (I have the right tool to remove it) Sure Tom no problem.

Above: Yeah these cones are shot alright. So I took the axle, with one of the bearings and the cones and spacers along with the broken spoke to Cycle Therapy in Waterford. I didn't have any black spokes and this is a really nice bike and I wanted tho replace the axle and cones with new. Cycle Therapy had everything I needed. They also had some citrus based Park Tool Chain Cleaning Solvent in stock. This is cool as I have been out of this stuff for what seems like forever.

Above: Although these bearings look o.k. to the naked eye, they have to be damaged if they have been rolling on those cones for a while. The young man who waited on me suggested I reuse the original spacers. I already knew this but I was impressed that he thought to mention it. Ernie has some good people working for him (at Cycle Therapy) who have kept me on the right track more than once.

Above: The take down and reassembly went fine without a hitch. Everything got a good cleaning and re greasing. Did you ever notice it is almost always a spoke on the drive side of the rear wheel that breaks? In this case it didn't matter as the hub had to be broke down anyway.

Above: I have placed the wheel just inside the small shop/garage door so I don`t forget it. I am meeting up with Tom and some other friends in the morning. As usual I have his old axle, cones & bearings along with the spoke in a zip lock bag. I guess I could have tossed the spoke in the wheelie bin. I`m pretty sure Tom knows it could not be repaired ...ltms
P.S. Didn't mention it but I did also true the wheel on the stand, after the hub was rebuilt of course. Chatting with Tom earlier this morning He told me the wheel has 1,500 miles on it. If I understood him correctly the hub was never broken down and cleaned / greased. I guess that would explain the condition of the cones.

Until next time, Please RIDE SAFELY and remember to always.....RESCUE, RESTORE & RECYCLE
Cheers,Hugh

Zebrakenko Mixte Restoration Part 2

$
0
0
Hello and Welcome,
I recently restarted the Zebrakenko restoration. I had striped the bike to the frame then sanded the frame using wet/dry sandpaper.

Above: To remove the paint from the nooks and crannies I used a Vermont American fine brass wheel brush. As for the drill I used my high speed DeWalt 8 amp Drill. CAUTION: You must WEAR SAFETY GLASSES or GOGGLES when using the wheel brush or any power tool that rotates in any way.

Above: After the sanding was finished I hung up the frame for about a month or so while I worked on some other projects. So when it was time to spray primer I quickly re-sanded the frame and wiped it down with mineral spirits. Now I am confident the frame is ready for primer.

Above: This is my first time using white primer. If I were to use grey or black primer it could show through in some hard to reach spots. My thinking is this white primer should make my Sunburst Yellow Rust-Oleum enamel really pop.

Also when the paints get chipped the white primer should make any chips much less noticeable. I am using Rust-Oleum brand primer for clean metal. After seeing the white primer I was wondering if I should have painted the frame white?

Above: After seeing the Sunburst Yellow enamel on the frame I am glad I decided to stay the course. I am considering installing white fenders (mudguards) or possibly chrome fenders with white tires. The weather has now turned cooler. The day I painted it was just warm enough to paint (50 degrees Fahrenheit) but the humidity was much lower than the maximum recommended humidity of 85%. The humidity was about 40% when I sprayed. Due to the cooler weather I am going to let the frame cure for a week or two before I start reassembly. I hope the cooler weather has not had a negative effect on the paint.

Above: Here I have wet sanded the fork. To remove the paint from and around the fork crown, I will again use the Vermont American fine brass wheel brush. The same goes for the *drop-outs.
* Drop outs: Sometimes referred to as drops, are the four points on a bicycle frame and fork, where the wheel hub axles fit into the slots. (on the rear frame or lower fork ends)

Above: Here "hopefully" you can see the paint removed from around the fork crown detail. I also use little pieces of gritty wet sand paper folded to get some of the really tight spots. Probably not my best photography.. sorry bout that.

Above: I had a very small "weather window" to get the fork primed and painted. If not in a rush I normally would have removed or taped off the crown race. That's my story and I'm sticking to it.

Above: I do need to order a set of Zebrakenko decals soon, which I believe are $29.99 . I will have to double check the model name. I think this one is a "Thunder" model. I am not real crazy about the idea of spending the 29.99 for decals. But I definitely want them.

Above: This photograph shows the "Thunder" decal located correctly on the drive side chain stay just behind the indentation in the stay. I often use photographs to check the proper location of the other decals and clamp-on cable guides, shifters etc. etc.

Above: I was going to refurbish and use this wheel set for the Zebrakenko. But upon closer inspection they are not exactly a set.

Above: This wheel is clearly marked 27 X 1 1/4 which is typical for old "bike boom" ten speeds from the 1970's

Above: This wheel is clearly marked 700 C. I am glad I gave them a closer look before I started cleaning them up. They were both salvaged from Motobecane road bikes but obviously not the same model.

Above: I might salvage the wheels off this Nishiki Century. It has a cheap (stamped) crank and appears to be one of their entry level models. I also have another option, a woman's Fuji that was just donated. But I also have a beautiful Fuji Mixte frame I wanted to use the recent Fuji as a donor bike for the Fuji Mixte. I`ll have to think about it while I am rebuilding the crank and headset.

Above: I think a "Zombie Ride" looks like it could be lots of fun! I have heard of "Zombie Walks" and such. But this is the first Zombie Bicycle Event I have seen. I guess I need to get out more. Or at least get to the city more. I hope if a Zombie Ride comes up in S.E. Michigan I hear about it in advance. I did order the Zebrakenko (Thunder) decals last night from Velocals and I think the frame is ok to handle now. No decision regarding the wheel-set yet. After I post this I will go take another look. The first order of business will be cleaning up the seatpost and installing it. Then I can mount the frame correctly in the stand and get to work on the headset and crank.
The Michigan VS Michigan State football game is on, and so far things are not looking real good for the Wolverines. I`m going to go watch the 2nd half inthe shop. This way something good can come out of watching the game.
Until Next Time...Please... RIDE SAFELY!.......And Remember to Always.....RESCUE, RESTORE & RECYCLE!
Cheers, Hugh

L.L.Bean Bike / All Terrain to Road Conversion

$
0
0
Hello and Welcome,
Before I get started I would like to congratulate Brian and Laura who recently announced their engagement. Why would I mention that here you may ask? Well Laura and Brian are my two best and favorite supporters. Between the two of them they own five (maybe six) of my bicycles. And they always bring me coffee when they come to visit. And I might add, It is Very Good coffee. And it just so happens that I took the L.L. Bean bike in on trade from Brian when He took home the Giant Attraction. Brian is also the owner and financier of the Rusty Raleigh bike. BELOW
And Laura is now the owner of the "Custom Built, Made in England Parliament".(below) One of my all time favorite bikes. It was important to me that this bike went to someone who would really appreciate it and treasure it. I do not think I could have made a better choice.
I still remember when I met Laura. She came here from AnnArbor to test ride and hopefully purchase a bike. Unfortunately the bike she came to see had a defective tire that had bulged badly during the night after being brought up to pressure. And I had not spotted it yet.(Laura spotted it right away) So she took out a different bike which upon return she described as a perfect fit. She purchased that bike instead. I guess the Bicycle Gods intervened on that one.
Above: Laura on the far left with that very bike. Brian is on the far right straddling the Giant Attraction. I wish them both a long and happy life together.
Above: In the background you can see the L.L. Bean bike looking pretty much as it did when it arrived. (less tires)
Above: Here I have stripped the bike down to the frame. Looking at the British Racing Green paint I am remembering a green Shelby Cobra I saw recently with white racing stripes. I am thinking white tires might look really cool on this British Racing Green frame. While I am ordering the tires I`ll order some white Cinelli Gel Cork tape. And then see if I can locate some affordable white track pedals too. But before any of that can happen I`ll need to rebuild the headset and bottom bracket.
Above: The "Crown Race" (A) and the "Lower Headset Bearing Seal" (B)are both in fine shape as are the upper and lower bearing cups on the head-tube. And the Headset Bearings look real good too. The cups just wipe clean with a clean rag. I will however need to degrease the bearings before I can regrease and install them in the upper and lower cups.
Above: The Headset bearings cleaned and ready for grease. Also pictured a spray can of White Lightning Clean Streak. I use a cheap strainer and pot purchased at K Mart for de greasing small parts. I just stuff a few dirty paper towels in the pot then place the strainer in the pot. Then I place the parts in the strainer and spray with Clean Streak. I also wear surgical gloves and have a parts brush for the really dirty parts. Using the parts brush allows me to use much less Clean Streak.
Above: Here I have greased the upper Headset cartridge bearing (B) And set it in place in the upper bearing cup (A). There is an Upper and Lower bearing cup on the Head Tube (C)
Above: I placed the greased lower cartridge headset bearing (E) into the lower bearing cup (D). With a little extra grease the lower cartridge bearing will defy gravity and stay in place. Now it is ready for the Steerer tube to be inserted from the bottom.
Above: Now with the crown race (H) lightly greased and the crown race bearing seal (G) in place I insert the Steerer tube (F) in from the bottom of the head tube. As the Steerer tube comes up to the top headset bearings I am careful not to knock the top "head set cartridge bearing" out of place. And I have the lightly greased threaded race for the upper bearings in hand or close by. Note: Not all crown races have a separate seal for the bottom headset bearings.
Above: The threaded top (i) of the Steerer tube is now ready for the threaded top race to be screwed down into position. It is just like a nut threaded on to a bolt, only not as tight.
Above: The threaded race (J) is threaded down properly. Just like hubs and bottom brackets what I am trying for is "No Grind & No Play" In other words it should feel smooth but not loose when I turn. If it grinds or feels sloppy I will need to re adjust. We are talking about very small adjustments here. As my friend Mike taught me many years ago "tighten the race until you feel it grind then back it off a hair".
Above: On most threaded headsets you will find a nub on the spacers and brackets that fits into a groove or channel (K) in the back of the Steerer tube. I think this is done for two reasons. First if the spacers above the threaded race can not turn because they are locked into position they will not turn when you tighten down the cap nut. Which means the spacers will not turn the threaded race (while tightening the cap nut) throwing the threaded race out of proper adjustment or torque. Also the nub and groove keeps the cable guide bracket or reflector bracket on center front when tightening. NOTE: This system does NOT always work very well. I like to hold the threaded race in position with a wrench while tightening the cap nut.
Above: It is important to keep track of the proper order that the spacers/washers and brackets go on the Steerer tube. Take a pic or make a sketch before you take the headset apart. On this one I kept the parts in order by putting a "zip tie" through the washers and brackets and top nut. Then as above I lay the parts out in the order I will be putting them back together. (left to right) I have marked the nubs on the washer/spacers. You may notice the nub on the cable guide bracket is barely visible. Also I have labeled the "Cap nut" (L).
Above: The stem. I have not mentioned the Stem because the headset assembly really has nothing to do with holding the stem in place. It slides into the top of the Steerer tube to the minimum insertion mark on the shaft. Then tightening the "Stem Bolt" (M) from the top it draws the Wedge-Nut (N) upwards. This basically wedges the stem shaft inside the Steerer tube. Hence the name "wedge nut". Pretty old technology but done properly it works really well.
Shortly after I installed the crank I decided to go with a road bike set up and changed both the stem and crank set.
Above: I was not happy with my first attempt at routing the front brake cable. I wanted to eliminate the need to loop the cable (red arrow) over the stem. To do this I will remove the cable housing stopper (black arrow) from the cable hanger. Now I have converted the cable hanger into a cable guide. To make all this workout right I will need to install a fork-crown mounted cable hanger.
Above: This Tektro Front Cable Hanger attaches to the front and center fork crown using the (caliper brake mounting or mudguard mount) hole that is already there. Of course the hole on the rear side of the fork crown is too small for the inset nut. So I will need to drill it out.
Above: After selecting a bit the same size as the inset nut I drill out the rear hole using the high speed DeWalt keyless chuck 3/8 drill. Before drilling a put a drop of motor oil on the drill tip. I will repeat this a couple times while drilling the hole. The oil will stop the drill tip from overheating and dulling. Also this is not one continuous hole through the crown as the crown is hollow. So it wont take long to drill the hole. You will however need a quality drill bit that is rated for drilling metal. I will not need to drill out the front hole on the fork crown.
Above: Now that the inset nut is in place I can go ahead and mount the cable hanger on the fork crown.
Above: Here I am attaching the cable hanger. I did (afterwards) have to add one thin star washer to the spacers so the cable hanger would not rub the lower bearing cup when turning.
Above: To get the same cable position on the rear brake cable I made a cable harness from a zip tie. I would have preferred using a figure eight harness just for a cleaner look. But I was unable to locate the one I know I have somewhere in the shop.
I chose this stem for it's short reach. This is a larger frame so I want to keep the handle bars in a little closer. Also the stem is fairly tall. This is good for me as I will be riding in a semi upright position. And the "flop and chop bars" are also all about hand position and my more relaxed riding position on the bike. I used normal road brake levers for two reasons. One they are salvaged (almost free) and while not visually as nice as some other choices, I found this set up very comfortable on my single speed / fixed gear "flat land commuter" bike. On this bike I put a lot of thought into the brake cable routing which was not "all that good" on the single speed flat lander.
Above: Again "trying to keep things symmetrical" I made up these two matching upper derailleur cable housings. Also I would like to mention, This is the very first time I have ever mounted the front brake lever on the right. Someone asked me about that recently, So I figured "what the #@!!" give it a shot. Maybe I`ll like it. I might not know until spring as it is really cold here now. (our first snow of the season on the ground this morning)
Above: It took a little while to get it right, but in the end I am very pleased with All the cable routing up front.
Above: After giving it some thought I decided not to go with the white saddle and cork infused handlebar tape. Since I have decided to try and sell my single speed/fixed gear flat lander, I will be keeping this one for a while. And the WTB Speed V Comp is "and has been for a while" my affordable comfort sport saddle of choice. And I thought if I go with the black and whatever color saddle I would go with the darker handlebar wrap as well.
Above: I swapped out the original Shimano Altus rear Derailleur for another I had salvaged that looks a little nicer. I spent more than a little while cleaning up the free wheel. It was pretty rusty. (surface rust) I was surprised how nicely it did clean up. I did not see the leaf up in there until after I took this picture. I picked up that leaf on one of my test rides. It has since been removed. Also I did polish the rims and hubs with Mother's Mag and Aluminum Polish. The spokes I wiped clean with Armor All cleaning wipes. The multi speed Schwinn chain is new. I have noticed lately that the lube that comes on the entry level chains feels like greasy crud someone scraped off the factory floor. I am not at all pleased about this.
Above: This is the original Shimano Altus front derailleur, or at least the one that was on the bike when I took it in on trade. So I have Shimano Altus front and rear derailleurs.
Above: The all terrain version of this bike had the twist grip shifters. I replaced those with this Falcon stem mount dual shifter. I took it apart (one side at a time) and removed the rust using the fine brass wheel brush. These should work well with my semi upright riding position. I used my (low speed) Black & Decker 18 volt cordless drill driver for the wheel brushing. Brass brushing with a high speed drill tends to toss small parts across the room. Some never to be seen again. ltms
Above: I rebuilt the bottom bracket and had to replace the cartridge bearings. The original cartridges were too loose and would not hold the bearings properly. Also one of the ball bearings was deformed. I was lucky that the cups were not damaged. I had set of bottom bracket cartridge bearings on hand that were a perfect match. Every build I try to focus on one thing in detail for the blog. On this build it is the headset rebuild. If you would like to see a "bottom bracket rebuild" in detail Go to the "Search This Blog" feature in the right side column (just below the Members) and enter "re assemble three piece crank"
Above: After I decided to go with the "road bike set" up I removed the black three chain ring Mountain Bike crank set. I replaced it with this SR Custom road crankset square taper which must have come off a Schwinn Sprint or something similar. I polished it up with Mother's. It appears to be a very low mileage crank. I am hoping to upgrade the crank in the not too distant future.
Above: These white Origin 8 Pro Track Lights can be had for 23.99 (at the time of this build) on Amazon.com. I did see them cheaper (about 22.00) But with the free shipping on my combined order Amazon was the best deal overall.
Above: They took a little while to get here but eventually I did install the new Jag Wire Mountain Bike brake shoes. I did polish up the cantilever arms but unfortunately a few of the mounting bolts were badly corroded. I think I might be able to replace these if the ones I have in mind are the correct size and length.
Above: I changed the color of the handlebar tape (red arrow) to match the black/grey saddle better. In fact I made several changes "on the fly" while building this bike. But that is part of the fun of building an "urban commuter". I also made use of the rack (white arrow) I traded Laura for my old air pump.
Above: Here is the L.L. Bean Bike finished. well almost finished, since this pic was taken I have changed how I have the rack attached. I was checking out some pics of this rack on other bikes and saw one or two mounted in a way that I think looks a little neater. Notice how the bracket/arms are attached from the upper rack legs to the seat stays on the frame.
Above: Here I have moved the support bracket arms to the front cross-member on the rack. Then I cut-off the excess support bracket arm (s) length and replaced the end caps. In retrospect, maybe I should have left a little more length on those support bracket/arms. Just in case I might want to move this tubular rear rack to another bike. You might want to check out the Axiom Journey rack as well. A very nice rack for the price.
I had to replace one of the (missing) inset screws that secure the support-bracket/arm. It was not available in chrome. You would think I would have just purchased two that match. Sometimes I wonder what the #@!! am I thinking about. LTMS... Oh well nothing that a black "magic marker" can not fix.
Above: The L.L. Bean Bike is finished (for now) I am considering adding hammered fenders and a little white vinyl detail (piping perhaps). Also like all my bikes (that I ride) it will eventually get a set of lights and perhaps a bell. I am truly sorry it took so long to get this post finished. Things have been very hectic around here this past month. But now that the new well is in. And the mess that went along with it is pretty much cleaned up. Things are getting back to normal. Well as normal as things ever get during the Holiday Season :) UPDATE: As you can see below, eventually this build went in a whole different direction.
Above: The L.L. Bean bike pretty much as it looks today. I did add one more accessory that I will talk about on a future post.
Above : One of our two cats "Eddie". Happy Holidays! See You Soon :) ATTENTION AMAZON SHOPPERS! You can help Support This Blog by simply shopping on Amazon dot com using the Amazon Search Box located at the Top Right Corner of This Page. It will not effect your cost and I will receive a very small commission. Thanks for your support, Hugh

A Note to my Blog followers / readers

$
0
0
I regret that I have not been blogging lately. We have had the most brutal winter we have had in quite a few years. It's just not feasible to heat the garage / shop this winter. And with the remodeling and redecorating of the living room (which is pretty much finished now) there is too much "stuff" stored in the downstairs family room to make room for a bike project. I needed to "take a break" anyway, so I guess maybe it was meant to be.

Above: The patio table just outside our eat-in kitchen door wall. This was to most snow from a single storm we have seen in years.

Above: This "Snow Egg" is actually an end table with a small flowerpot on it. At one point the windchill factor was -30 degrees Fahrenheit. Not the worst I have seen here, that was - 47 F. But none the less it's been really cold! This snow was followed by what some call an "Arctic front" around here we call it an "Alberta Clipper". We have another arctic front coming through tomorrow night. Tuesday's high is expected to be + 8 degrees Fahrenheit, it should be a "cake walk" compared to the last one.

Above: The ice storm that knocked out the power for a large part of this area was the biggest we have seen (right here) since the 1980's. We were lucky, the power outage area started on the next street. I'm not getting this in the correct order the ice storm came first.

Above: The ice storm did make for some great photo ops. This was taken in the State Park "Highland Recreation Area" just a few miles from here. The Ford family once had a summer home there. I think the Ford family donated the land that is now part of the state park.

Above: It's hard to believe I took this picture out the same window just a few months ago. To help pass the time we have been finishing off the living room and getting some things "fixed" from the kitchen re-mod last summer. And we are planning our next vacation, which looks like it will be on Mackinac Island again. Which we are very pleased about:) This time I might rent bikes instead of hauling one up there. Then I can blog about the different bike rental places and options.

Above: The old picnic table out back is rotting away. We only use it for feeding the squirrels and birds these days.

Above: For comparison....The same picnic table this winter. Don't get me wrong, I don't hate winter, I just don't love it as much as I once did. I`ll have the blog back up and running when the weather breaks. Enjoy your winter wherever you are :) Cheers, Hugh

The 30 Day Pledge to Ride Every Day in April

$
0
0
Hello and Welcome
Before I start I would like to thank Ryan from Ryan's Rebuilds for posting this "30 day pledge thing" on his face book page. It really gave me some badly needed motivation to get this riding season started in a good way. You will find the link to Ryan's blog in the right side column in the "Blogs By Friends and Followers" section.

I know my registration card is tough to read so what I wrote is this "Because it has been a long hard winter and I really need to get in shape" Here is the address or HTML if you would like to sign up http://30daysofbiking.com/

April 1st : Day one went really well. I picked the perfect men's bicycle for the short ride, my 1964 Raleigh Sports 3 Speed. Having not been in the saddle for months, comfort was my number one priority. And the comfort level of the Brooks Saddle really impressed me, And I was pleasantly surprised by how well the old Raleigh coasted down hills. And believe me I was coasting as much as humanly possible.

Above: Aesthetically speaking this is not my favorite time of year. The lakes are still frozen and nothing is green yet and everything seems to have that "battered by winter" look. But this year Winter Was So Bad, I will embrace the outdoors as much as I can regardless of how things look right now.

Above: The roads here take a real beating in winter as well. There are lots of stories on the local evening news about pot holes and each cities efforts to deal with them. Which is challenging as most municipalities went way over budget trying to keep the roads clear and salted this winter season. At times salt could not be found anywhere.

Above: I suspect many people do not know this..... There are huge salt mines under Detroit. From what I have heard the salt miners had a boom season. They were hauling salt away as fast as they could bring it up. Funny..... Detroit makes cars.... Salt eats cars..... Mine more salt.... Spread it all over the roads.... Then build more cars! Now that's is a self sustaining economy!

Day 2: Today I decided to take the Diamondback 29'er out, which worked out really well. All that was needed was a little more air in the tires and it was "good to go". When I put the 29'er away for the winter I made sure the chain was on the smallest cog or sprocket in the back and on the smallest chain-ring up front. This prevents the front and rear derailleur cables from being stressed (taunt) all winter and stretching. I don't know how many times I have heard someone say this about their bike "My bike was fine when I put it away, and now it is not shifting properly." And quite often all that really needs to be done is to have the slack taken out of the shift cables. So why not just avoid the whole problem? I have never been told by anyone to do this, Is this like the best kept secret in the bicycle world? Is this not known? Or is it just "bad for business" to tell people to do this simple thing?

Above: Riding along the unpaved shoulder (by choice) I unexpectedly rolled into a real soft spot in the dirt. I stood up on the Shimano PD-M520L MTB Sport Pedals and the 29'er powered through it easily. If I had accidentally rode into this on one of the road bikes it probably would not have gone so well.

Above: I tried to get a correct angle shot to show just how deep the WTB WOLVERINE 2.2 29" Tires sank into this wet spot in the soil. The 29'er never ceases to amaze me with it's ability to roll over or through damn near anything. It is the perfect bike for the mixed terrain around here. And it is really comfortable, on or off road.

Above: Today I rode around 7 Harbors for a while. It is mostly paved, and all the canals make for some really nice views. Another plus is.. there is not much traffic in there during the middle of the day. Just a smooth and peaceful place to ride.
Above: Another nice view from 7 Harbors. Just around the bend in the canal I spotted a small foot bridge. I will try to remember to get a picture of it next time I am there.

This is one of the few places I would be willing to move to around here. But we have good neighbors here and have no plans of leaving any time soon. I am just saying, if we had to move...

Above: I couldn't help but notice the Knee Board sticking out of the ice at the end of the dock.


Above: Back home and feeling a little fatigue in my legs but nothing out of the ordinary after not riding in quite a while. Like most every springtime I am weighing in right now at just under 200 lbs. This year I think my target weight will be 180 lbs.
Above: We have not seen any hummingbirds yet, I have been checking the migration reports online. Hopefully they will be here soon. Until Next Time...Please... RIDE SAFELY!.......And Remember to Always.....RESCUE, RESTORE & RECYCLE!
Cheers, Hugh

The Zebrakenko and other stuff too

$
0
0
Hello and Welcome,
Well spring has finally sprung and it is time to get the Zebrakenko bike project moving forward again.

Above: As luck would have it, the threaded headset I ordered for the Zebrakenko does not fit. So I scrounged this one up from a few old parts bike frames that I kept around for just such an occasion. I am pleased with this headset it is quite smooth the bearings and cups are in fine shape. After de greasing with White Lightning Clean Streak and cleaning, everything got re greased and reassembled. I`m not feeling this stem though. It does not really fit with the style bike I want to have when finished.

Above: This handlebars and stem combination fit my vision for the Zebrakenko perfectly. I am not sure if the stem off a Dutch bike will fit this Japanese beauty, but I will soon find out.

Above: I would like to explain my next choice. I really love the look of the L.L.Bean bike finished. The L.L. Bean started life as an all terrain bike. However, I hate the ride! It is much too stiff for me. I can feel bumps I can't even see. My narrow and low profile HP tire choice was terrible. Which also led me to using very narrow mud guards or fenders. I have wanted to go to a wider fender and beefier tire selection. But I can't afford to waste a perfectly good set of tires and Velo Orange Hammered mud guards.

Above: My solution is to use the white tires and Hammered Velo Orange mud guards
 on the yellow Zebrakenko project. Please note: I have not yet fine tuned the fenders. I will not be using the wheels off the L.L. Bean. Hopefully I will be able to scrounge up a vintage set of 700's for the Zebrakenko. It had a mixed set of wheels on it when I took it apart, one 700 and one 27 inch lol. So hopefully I can refurbish the 700 and I will only have to find one matching wheel. Part two of the plan is to sell this bike and use the cash to finance all the changes to the L.L. Bean bike. Honestly, I think I could really enjoy riding the L.L. Bean with the right set up.

Above: The buckle part came off the pouch that holds the battery pack for my Cree Headlamp to the head tube on my 29'er. I was going to sew it back on, but before I could Eddy (cat) made off with the pouch. I had not been using the pouch for my Topeak multi tool. Since I keep the multi tool in my wedge pack anyway, the pouch seemed unnecessary. But it does make an awesome pouch for my battery pack.

Above: I have it double zip tied (through the belt loop) to the head tube. As seen above, I just leave the pouch on the bike all the time. The pack is secured much better now. And there is no need to constantly check it and re tighten the velcro straps all the time. A huge improvement indeed! One good zip tie will do the job, the second is just for back-up.

Above: A friend of mine accidentally struck a bicycle (ladies bicycle) that was traveling the wrong way (on the shoulder) when He was pulling out from a side street. He did brake hard, but despite his best efforts He still bumped her over. I feel for him, because the same thing almost happened to me the summer before last. I was pulling out of a side street when a girl riding the shoulder in the wrong direction, seemed to appear out of nowhere. I did stop in time, but it was a matter of inches that I missed her by. It really shook me up! But she seemed oblivious to the whole thing as she pedaled by. The lesson here is twofold. One: If you are on the shoulder riding in the wrong direction, don't assume people are going to see you. Two: If you are driving in your car don't assume some dumb ass isn't coming down the shoulder on the wrong side of the bloody road! When I rode motorcycles my motto was this "Always expect the other guy to do the stupidest thing imaginable."

Above: Anyway this was her rear wheel, I also trued her front wheel and adjusted her rear derailleur. At the time I laced the wheel, I did not know the whole story. So if you saw me post it on the face book page as "my friends wheel" that is because "at the time" I thought it was.

Above: My first total wheel rebuild was a smashing success! (pun intended) Only a slight limit screw adjustment on the Low end was required to make it function properly. And being a Department Store Bike, it was likely already out of adjustment. Also I reset all the brake pads properly which were all "Willy Nilly" for lack of a better description!

Above: Riding my Raleigh Sports on Easter Sunday. My pledge to ride my bike everyday in April "fell a little short". I did manage to ride my bike 27 days. That's much more than my typical April, that's for sure. It wasn't the weather that messed me up, it was more of a time issue. I did manage to ride all the really bad weather days though. So I am 95% satisfied with my pledge.

Above: This picture "taken from my bicycle" is of a canal in 7 Harbors. It was taken in early April 2014. The canal is still frozen and you can still traces of our record snowfall we had this winter. Camera: Fuji Film FINE PIX S4500

Above: The same canal on April 29th 2014. The ride on the 29th was most enjoyable. It was a long, cold and snowy winter. A winter that won't be forgotten anytime soon by folks around here. But finally it is springtime and everything is coming back to life. I put out one of the Hummingbird feeders after checking the migration report. I have not seen any Hummers yet. But they should be making an appearance at any time now.

Above: Recently... I was finally able to convince my bud Tom to let me swap out his high mileage wheels for this 26 X 1.50 wheel-set off my old low mileage 1980's Rock Hopper FS. I have shown work done on both his front and rear wheels on here and on the face book page. Tom had the most battered set of cones on his rear wheel axle that I had ever seen.

Above: Tom has reported back that the wheel swap was a great idea. He says it is rolling smoother and coasting better as well. Now if I can just talk him into a set of beefier road knobby tires. Some phat tires would really smooth out the ride in the back.

Above: As of late I have been working on my friend Brian's FELT Q-720. It has been an educational experience "for sure". So look for a post about that real soon. Also the beefier tires for the L.L. Bean have arrived :) Aaaaaannnnnnd.... when Brian's FELT is finished I should be able to resume work on the Zebrakenko. I have received inquiries about 2 restorations, but nothing has developed yet.

Until Next Time...PLEASE... RIDE SAFELY!.......And Remember to Always.....RESCUE, RESTORE & RECYCLE!
Cheers, Hugh

FELT Q 720 Mountain Bike

$
0
0
Hello and Welcome,
Recently I had the pleasure of doing some work on a FELT Q 720 Mountain Bike. I remember seeing a FELT on Mackinac Island with Hydraulic disc brakes and I was really impressed. As some of you already know I work on lots of...... let's say "less expensive" bicycles. So this was a real treat. And as it turns out, an educational experience as well.

Above: Let's start with the chain. I got a call from my friend Brian (the owner of the FELT) early one evening. His chain had broke and He was stranded. He wanted to know if I had a chain in stock. It turns out I did have a "Shimano Multi Speed Chain" in stock, so off I went. I replaced the chain. After replacing the chain Brian told me it was skipping on the smaller cogs or (higher gears). I asked him which cogs he typically rode on and I think he said the bottom three. So thinking the cassette is worn (I already knew the bike had not been serviced in quite a while) I asked him to shift to the larger cogs. When he did the chain stopped skipping and seemed to be working ok. So I came to the conclusion that the 9 speed cassette was shot. I told Brian he could order one from me if He wanted to. (via my Online Bike Shop) He said that would be fine. So I told him I would go home and check stock and make sure I had his cassette in stock. I called Brian to make sure I had the cassette with the correct cog sizes. I told him I would label his cassette (in the online bike shop) so he would know it was the correct cassette. I believe I labeled it "Brian Order This One"..lol

Above: Here is the old cassette which I de greased using White Lightning Clean Streak. I will be cleaning up these cogs and then Brian will have some spare cogs as half of the cogs look to be fine.

Above: This is when the repair became frustrating. At this point I had cleaned up and lubed the rear derailleur which was really gunked up. The axle, cones and bearings have all been replaced. I also replaced the derailleur cable and the short cable housing at the derailleur. The inner workings of the Rapid Fire Shifter have been cleaned then sprayed with a silicone based lubricant. And I had replaced the cassette with the new one. But the damn chain was still dancing all over the smaller cogs and the damn thing was still skipping like crazy. I set the index with the chain on one of the center cogs, this did not help a bit. So I removed the largest chain ring and headed of to Cycle Therapy to get it checked. I was fortunate that Ernie "the proprietor" just happened to be there.

Above: Just happened to find this pic of Ernie on Google. Ernie and his Team at Cycle Therapy in Waterford Mi are Great. They have helped me out on more than one occasion. Ernie said the chain ring appeared to have plenty of miles left on it, and He didn't think that was the problem. So I told him step by step all the work I had done. At first Ernie suspected the derailleur might be the problem. That is until I mentioned the "Shimano multi speed chain". Ernie asked me, Is it a nine speed cassette? Yes it is, I said. Then He asked, Did the chain package say those exact words Multi Speed Chain? Again I answered Yes. Ernie said That is your problem. He went on to explain that a nine speed cassette like the one I am working on requires a nine speed chain. I said, That's gotta be it! That explains why the chain won't settle down, even though everything says it should be working fine.

Finally a solution! Ok, I install the new KMC 9 speed chain (above) and it seems to be working fine. It is now staying on the cogs and seems to be good to go. Although it seems to be louder than normal. Like it is barely fitting over the teeth on the front chain ring. I'm thinking maybe that is the wear on the chain ring. They said the chain ring did show "some wear". So I test rode the bike, and the bloody chain bound up on something and broke. CHEESE and FRICKEN RICE!!!! W.T.H.!!!! So I calm down and get on the computer and locate the specs. (finally)

Now I call down to CYCLE THERAPY and ask Chris (not the Chris I know, the other Chris) If he has the Shimano CN-HG53 Chain in stock. They do, "Excellent please leave it at the register and I`ll be down to pick it up straight away". Finally a solution! & it worked! The chain is smooth and much quieter and she is now shifting wonderfully. Thank You Bicycle Gods and Thank You internet. And Thank you Ernie for pointing me in the right direction.

Above: This is the first replacement chain (multi speed Shimano) floating around "particularly on the smallest three cogs" (7,8 & 9) Watch the chain on the smaller cogs. At this point I was getting frustrated. It was shortly after this that I removed the large chain ring and went to see Ernie at Cycle Therapy in Waterford. You can hear the frustration in my voice at the end of the video.
Above: Ok.... let's talk about something that went well. Brian's front cones were shot. I had the bearings in stock, and Tree Fort Bikes in Ypsilanti, Mi had the cones in stock. Also the front wheel "trued up" perfectly. I used Brian's Park Tool Poly Lube on both hubs. The front wheel trued so well that.. the last thing that rubbed the caliper pin on the truing stand was the manufactures sticker on the rim! And the sticker was not peeling off.

Above: Top Brian's rear axle and cones, the bottom axle and cones show normal wear. If you blow up this pic you can really see the difference. I was able to order the cones online for the rear axle as well. But at this moment I really can't remember from where...lol

Above: I had not planed to blog about this bike, so I never took any "before" pics. (my bad) So here is some of the work done on the rear end of the bike. First I rebuilt the hub replacing the cones, bearings & axle. Next the wheel went on the stand for truing. Sometimes you can tell if the wheel has been worked on before. I noticed that where the wheel was rubbing the pin indicating the spokes on the opposite side needed to be tightened, those spokes were already really tight. This tells me that someone may have already tried to straighten or true this wheel. So I check the spokes for tightness on the same side that the wheel is rubbing the pins. (on the wheel truing stand) They are really tight as well. So I loosen the spoke or spokes (just a wee bit) near the rub allowing the wheel to be pulled away from the *pin*.(*pin* refers to the caliper pins on the stand that the wheel will rub if they are set close and the wheel is not straight) Also I was able to tighten the spokes on the apposing side just a wee bit.
Above: This gentleman has made the best wheel truing tutorial video I have ever seen. I don't think I have ever seen anyone explain the process better than he does. So I share this with you. And hope you enjoy it as much as I did.

Above: Here are the other things that were done to the rear half of the drive train. Violette Arrow ~> Installed the new 9 speed cassette.... White Arrows ~> Cleaned and lubed the entire rear derailleur paying particular attention to all the pivot points that connect the Upper Knuckle to the Outer Parrelogram which connects to the Lower knuckle..... Red Arrows ~> De-Ggreased and lubed the upper and lower Jockey wheels (huge chunks of crud cleaned off the jockey wheels) And cleaned the inner and outer Jockey Wheel Cage plates....... Blue Arrow~> Replaced the Chain.....how many times? lol "I'm not taken the rap for the second chain! ".......Green Arrow........made up a new short cable housing at the rear derailleur......Yellow Arrow ~> New Jag-Wire Shift Cable....Orange Arrow ~> cleaned up rims, spokes and pie-plate....Pink Arrows ~> Installed new inner tube and tire.
Above: Here I am cleaning away excess de-greaser before spraying the Rapid Fire shifter internals with Tri Flo (a silicone based lubricant) I also sprayed into the shift cable receiver hole with a de-greaser (Clean Streak) and after some drying time.. some Tri Flo lubricant as well. Cleaning and lubing your Rapid Fire Shifters will greatly improve their performance. (if they're just not shifting as well as they once did)

Above: The front derailleur would not even react when I first tried to shift it. After spraying and brushing it twice with Clean Streak and lubricating it with Tri Flo it seemed to work fine. I replaced the cable since I had removed the original cable to clean the Shifter internals. I probably could have re used it, it actually looked pretty good. But cables are cheap, so I went ahead and replaced it anyway.

Above: The pedals were shot so I put this cheap set on for Brian to use until he orders a new set. Hopefully he wont throw these away, I could always use them on some kids Department Store bike.

Above: I couldn't be more pleased with how the front hub and wheel came out. There was a lot of play in the front hub when I got the bike. I expected the hub to be destroyed inside, but it was not all that bad. I cleaned it out and replaced the cones and bearings and then it spun real smooth. And it trued up beautifully. Removing the discs is really easy. One of my Park free wheel removal tools fit the retainer ring perfectly.

Above: Brian has the FELT Q 720 back now, he is planing on installing a better rear rack. Also I think he has already ordered new pedals. Brian says he thinks their is a problem with the crank. I told him I am really not comfortable taking apart his Hollowtech crank. We plan on hauling the bike to Cycle Therapy to have the crank serviced. Hopefully I can see first hand how this crank works and how to remove it and replace it. I would rather the first Hollow Tech crank I work on belong to me.
Here are some random pics from the project

Above: The front axle and cones from the FELT Q720. Now I recall it was TreeFort Bikes in Ypsilanti Mi who had the correct cones in stock. I ordered these from their online store. Although I have never been there, I hear their bricks and mortar store is nice too!

Above: The info for finding the correct cones is printed right on the hub. In particular the Shimano RM65. I actually located the cones for another Shimano hub first, but it stated they would also fit the RM65 hub as well. (I got lucky)

Above: I always look for < Grade 25 > steel bearings, as I have been told it is the highest rating for steel bearings. On the other side of the bag it is labeled Campagnolo. I hear they make pretty good stuff too! ltms

Sorry for the delay folks, I mentioned on the Face Book page this would be published Sunday, obviously I didn't make it happen. Until Next Time...PLEASE... RIDE SAFELY!.......And Remember to Always.....RESCUE, RESTORE & RECYCLE!
Cheers, Hugh

Trek Multi Track 700 / Plan B

$
0
0
Hello and Welcome, At the end of the last post regarding the Trek Multi Track 700 I stated that the test ride had revealed some problems. So many in fact I decided it would be best to go in a whole different direction.
Above: Above for starters (A) The road bike brake levers do not have enough range to operate the brakes properly. I had spent some time positioning the levers so that the suicide levers were within easy reach. If you are thinking all I needed to do was set the levers up higher, you are wrong. Because doing that positioned the suicide levers much too low to be reached easily. But there are bigger problems (B) The stem mount index shifters that arrived were actually down tube shifters. So no big deal I will mount the index shifters on the down tube. Not a bad idea, except they don`t fit the over sized down tube. Not to mention that I know Laura likes her shifters mounted up high. (C) The chain is stretched, no big deal I already made plans to replace it if necessary. Now (D) The rear derailleur is all over the place, tightening the shift levers did not help. And I set the limit screws on the rear D when I had it on the stand. It seemed to work fine on the FeedBack Work Stand. But on the road with a load and resistance "it's a mess". So where do I go from here?
Above: Laura had brought this partial bike she purchased from a sporting goods store. It is pretty nice. But I know she wanted drop handlebars if possible. But she also mentioned she could live with straight bars if necessary. (just no risers) Well it looks like with the brake lever problem, the shifter problem and the sketchy rear derailleur... The straight bars just became necessary. Above (E) straight bars with nice levers and SRAM X4 Impulse Shifters. And (F) a very nice looking 8 speed derailleur. (but I`m not sure about that hook up) At this point I drag both bikes to the basement. I am a little "pissed off" now. But this also has my Adrenaline up. And I am in the perfect mood for a late night in the basement / make shift bike shop.
Above: I removed the drop bars with the stem attached. I also removed the stem mount friction shifters. I had disconnected the brake cables to keep those with the drop bars and stem. Then I removed the front and rear derailleur cables along with the rear derailleur and the chain. Fortunately I had a salvaged mountain bike stem (and cable hanger) on hand in the correct size. (sometimes it pays to be a hoarder)
Above: I removed the shifter, brake lever and grip and bar-end from the left side of the straight bars. Then slid the bars into place. The brake cable routing is totally different now. So I installed new cables and cut new lengths of cable housing. Luckily I still have white cable housing left over from the Parliament restoration. Once the brakes are hooked up I can see that they will no longer be an issue. Now for the Rear derailleur.
Above: I had two concerns about the SRAM derailleur, (1) The mounting was different. And (2) The SRAM is an 8 Speed derailleur and we have a 7 Speed cassette. The mount was simple, I just removed the bridge piece that connected the derailleur to the machined drop out on the parts bike. After that it attached to the drop out just like the original. Things are looking up. The first time I ran it through the gears (on the stand) it over shifted the largest cog. After shortening the reach by adjusting the (L) low limit screw that problem was solved. There was no problem with the shifter to the front derailleur as both bikes had triple chain-rings.
Above: Well I have made all the changes, and I am feeling pretty good about life in general. But I still need to test ride the bike again to be sure everything is "good to go". Unfortunately the weather has gone from bad to worse. It is icy and snowy, that's not so bad. But it is also colder than a bat's A&&. I am getting too old for this $#!& I'm gonna have to wait until the weather lets up.
Above: The weather finally let up a little, although it is still pretty cold. The test ride was both good and bad. The brakes are working great.(yeah!) The tires are surprisingly good in the light snow over hard packed snow on the road. The front derailleur is working beautifully and the rear derailleur is shifting crisply and smoothly. There is a problem though. On the two cogs (or sprockets) above the smallest cog (6th and 5th gear in my book) it is slipping. Every where else it is fine...%$#@!!! It has to be the #@! %@ cassette! I have to go to the L.B.S. (15 miles away) and get the original cassette removed. On close inspection the teeth on those two gears (5th and 6th) are not looking too good. Funny thing, all the other sprockets or gears look pretty good. I order a new Sram 8 speed cassette. I got this Really Stupid idea that removing the pie plate would give me enough room to add another gear. I have done it before with a five speed free-wheel. Only one problem, This ain't a %$# @*%$ freewheel! What the #@&$ was I thinking. Removing the pie plate ain't gonna make the slots in the hub any deeper! How can I be so %#$@&%$ stupid!
Above: A few days latter (actually more than a few) the new SRAM PG830 cassette shows up. And as feared it does not fit. I did manage to find a 7 speed SRAM PG730 cassette at Cycle Therapy Waterford Mi.(15 miles one way) Only one more little problem. I still have not received delivery of my new Park Tool FR 5G (Shimano/Sram cassette removal tool) The tool I ordered the same day I ordered the first @#& %&@% Cassette! No worries I am sure the new cassette tool will arrive in the morning. Wrong again! Anyway I have a tool that almost fits. And I was able to snug up the 7 speed cassette pretty good. Why not just take the wheel with me when I went to pick up the 7 speed cassette? I did not think of that until I was almost there. I was kick'n my self in the a$$ at every turn on this project. Why stop now? ltms
Happy! Happy! Joy! Joy! It is finally working properly :) Tomorrow Laura is coming to pick up her new winter ride. (just in time for summer) I have no idea why I thought I could make the 8 speed cassette work. I know there was a tiny voice in the back of my head saying "Hugh, just order the 7 speed cassette, the 8 speed might not fit" I really need to learn to listen to that little @%&%#@!
Above: Considering where I started I think it came out pretty good. I hope Laura agrees it was worth the wait (well most of it anyway) to get it right. UPDATE: The new Park Fr-5G Cassette Removal Tool showed up the morning after Laura picked up her bike. UN #%$&*@% believable!
Above: The drop bars did not go to waste. I think they look awesome on the L.L. Bean bike. And with the suicide levers I can still ride in the semi upright position. But what did I do with the flop and chop bars that were on the L.L. Bean ?
Above: Well they did not go to waste either. I think I finally found the right look for the free Spirit fixed gear bike. And the bars that I removed from the fixie? Those are going to the scrap guy for recycling. A good deal all the way around :)
Before I close I would like to say Sorry about all the #%& @% swearing! Sometimes nice words just don't get it done :) Until next time Please RIDE SAFE and Remember to Always.....RESCUE, RESTORE & RECYCLE!! Cheers, Hugh
Someone made "The First" few purchases at Hugh's Online Bike Shop the other day. So THANK YOU whoever you are. I hope you enjoy your purchases.

Mongoose 24 inch 21 Speed Girls Mountain Bike

$
0
0
Whenever I don't feel like working on a department store bike. I remember a time about 34 years ago when I needed my front wheel trued on my Sears 10 Speed. (it may have been a 12 speed) Anyway, when I took it to the local bike shop in Rochester Mi I got the "bike snob treatment". I remember this total ass telling me my Sears 12 speed was not the sort of bike they work on. And then he quoted me some ridiculous price for estimated labor to true the wheel. Knowing what I know now, I am sure it would have only taken a few minutes to true the slight wobble out of the wheel.
I sprayed a little White Lightning Clean Streak on the rear derailleur and cleaned it up a bit. I then sprayed it and the freewheel with Tri Flo and also sprayed the chain (as I rotated it on the stand) with the Tri Flo. Then I wiped off the excess with a rag. The real wheel was badly in need of some truing. I tried to "true it up a bit" on the bike (with the air let out of the tire) that wasn't getting it. So I removed the wheel and brought it inside with my truing stand. My vision is pretty bad now so I really needed to flood the room with light so I could true the wheel correctly .
Well I managed to get the wheel trued up pretty good and put it back on the bike and re-set the brake after installing a new cable. The 7 speed grip shift for the rear derailleur worked fine, so I left it alone. But the Grip Shift for the front derailleur was locked up tight. I could move the front derailleur by hand. So I disconnected the cable and removed it from the housing. I thought maybe it was just stuck inside the housing due to excessive corrosion. The grip shift still wouldn't budge, so I removed it.
As I have done in the past I replaced the 3 speed grip shift with this salvaged thumb shift lever. I found it in a box that contained some salvaged shift levers of different sorts. It worked just fine. I thought I should check e bay latter for a replacement, which I did. A new 3 speed grip shift with cable delivered to my door for 13.00. Air Cav Paul (my friend who brought me this kids bike) said go ahead for 13.00 we'll just replace it. Which I did latter. Sorry no pics of that.
As is typical of department store bikes none of the bloody cables had crimp-on tips, and they were all frayed on the ends. The new cables got new tips of course and the other two cables got trimmed and new tips installed.
There was no front reflector so I found one in the "old reflector box" and put it o the stem.
Once the new grip shift was installed I trimmed the cable and crimped on a cable tip. At just under 200 lbs I had my doubts about test riding the bike to make sure everything was working. I went ahead and rode it just far enough to go through all the gears and make sure the brakes were ok. The brakes screeched a bit but they do work. I didn't have any "threaded post" brake pads so I told Air Cav Paul to order a set. And if he needs me to do so, I will install them and adjust the brakes "free of charge".
I think I took this pic before I installed the new grip shift for the front derailleur. Doesn't really matter, you can't see the bloody thing anyway. With my vision not being anything like normal I have learned to slow down, and be real careful where I set things down. A few weeks ago Paul brought me his old bike for a few adjustments. I don't look for bike work anymore. But if it comes in I'll do it "if I can". I will be around the house more in the near future, so I expect I'll be starting some sort of bike project soon.
Above: This is Jimmy. He was one of our guests for Memorial Day. His back legs don't work anymore, so he has this cart. He is a very happy dog and he loves people. When I first heard about his injury I thought, "maybe they should just put him down". But after seeing how happy he is. And seeing how much he loves his cart and his owners.. Well I think Jimmy is doing real fine, just the way he is. Sometimes you can learn a lot from a dog.
Above: A minute on the Duck Lake Pines path today 05-30-17
Until next time, Please Ride Safe and Remember to Always Rescue, Restore and Recycle. Cheers, Hugh
Viewing all 57 articles
Browse latest View live